Connector Proxy
Connect is a proxy service from IoT SIM that can receive CoAP messages and forward them as HTTPS messages and return the response.
June 20, 2023
Table of Contents
Overview
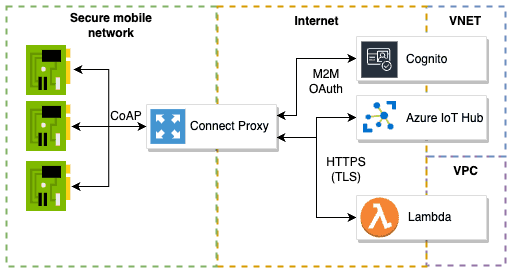
Connect is a proxy service from IoT SIM that can receive CoAP messages and forward them as HTTPS messages and return the response. This proxy service ensures that the CoAP messages sent by the IoT device can be transmitted in a format that the HTTPS server can understand. This allows IoT devices to use the lighter CoAP protocol within the secure network without having to worry about TLS encryption as well as authorization. This type of proxy server is particularly useful when integrating IoT devices with an existing HTTPS infrastructure without requiring any changes to the existing servers or services.
Basic proxy functionality
As described earlier in the introduction, the proxy acts as an interface between the IoT devices and any HTTP backend. CoAP messages sent to the proxy are first converted to an HTTP message. This step also incorporates information such as the method and content type. In this process, the message content (payload) is taken without any other processing. The header information, on the other hand, is not natively included in CoAP but can be set if required. In addition to the self-defined header information, the proxy automatically sets the headers described in the the section Header fields.
The last step of the conversion involves the translation of the target address. In simple terms, only the host part of the proxy is replaced by the host in the target URL. If the device uses a path and query parameters, these are retained. Suppose that the host of the proxy is coap://proxy.connect-internal.iot-sim.tech:5683 and the target URL is https://xyz.ee/iot/. When a device addresses the CoAP message to coap://proxy.connect-internal.iot-sim.tech:5683/sensor_data?type=temperature, the HTTP message ends up at https://xyz.ee/iot/sensor_data?type=temperatur.
Once the outgoing HTTP message is composed, it is sent to the newly defined destination. Within the defined timeout, a response is waited for. The timeout is 3 seconds by default but can be defined in a range from 10 milliseconds to 5 seconds.
As soon as the HTTP response comes back, it is decided whether the response is converted into a CoAP response and sent back or not. This is defined by the "Confirmable" option of the initial CoAP message. If a response is to be returned, the status code and the content type are translated accordingly. The header information is discarded.
Authentication
Normally, access to the HTTP backend is and should be secured. There are two ways to realize authentication.
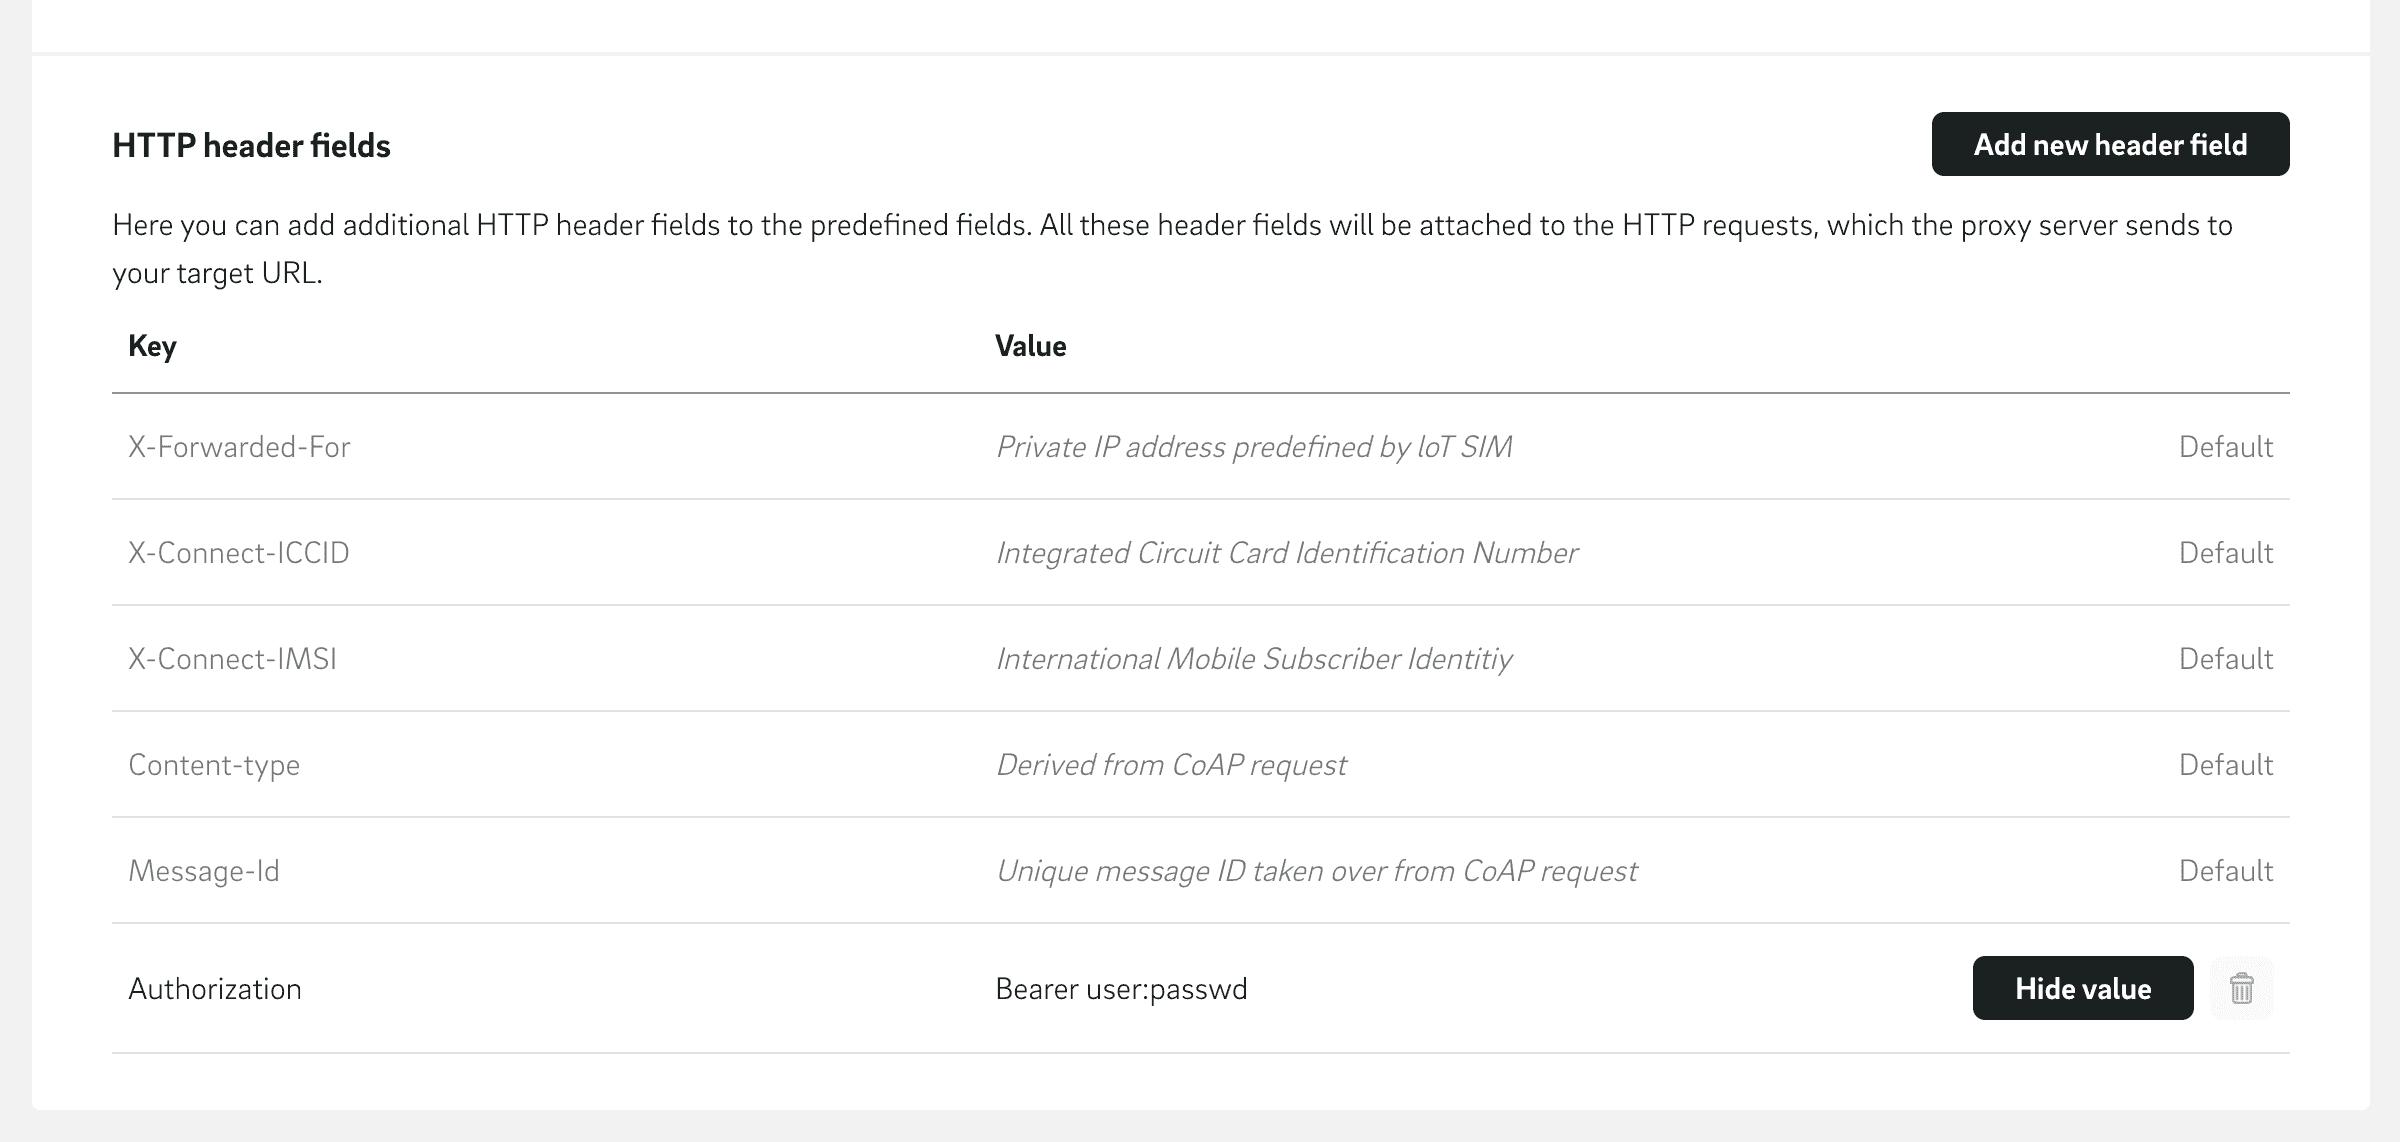
The simplest variant is a shared key, or bearer, which is set in the header. This header information can be set via the configuration page of the portal. If required, this value can be rotated periodically via the portal API.
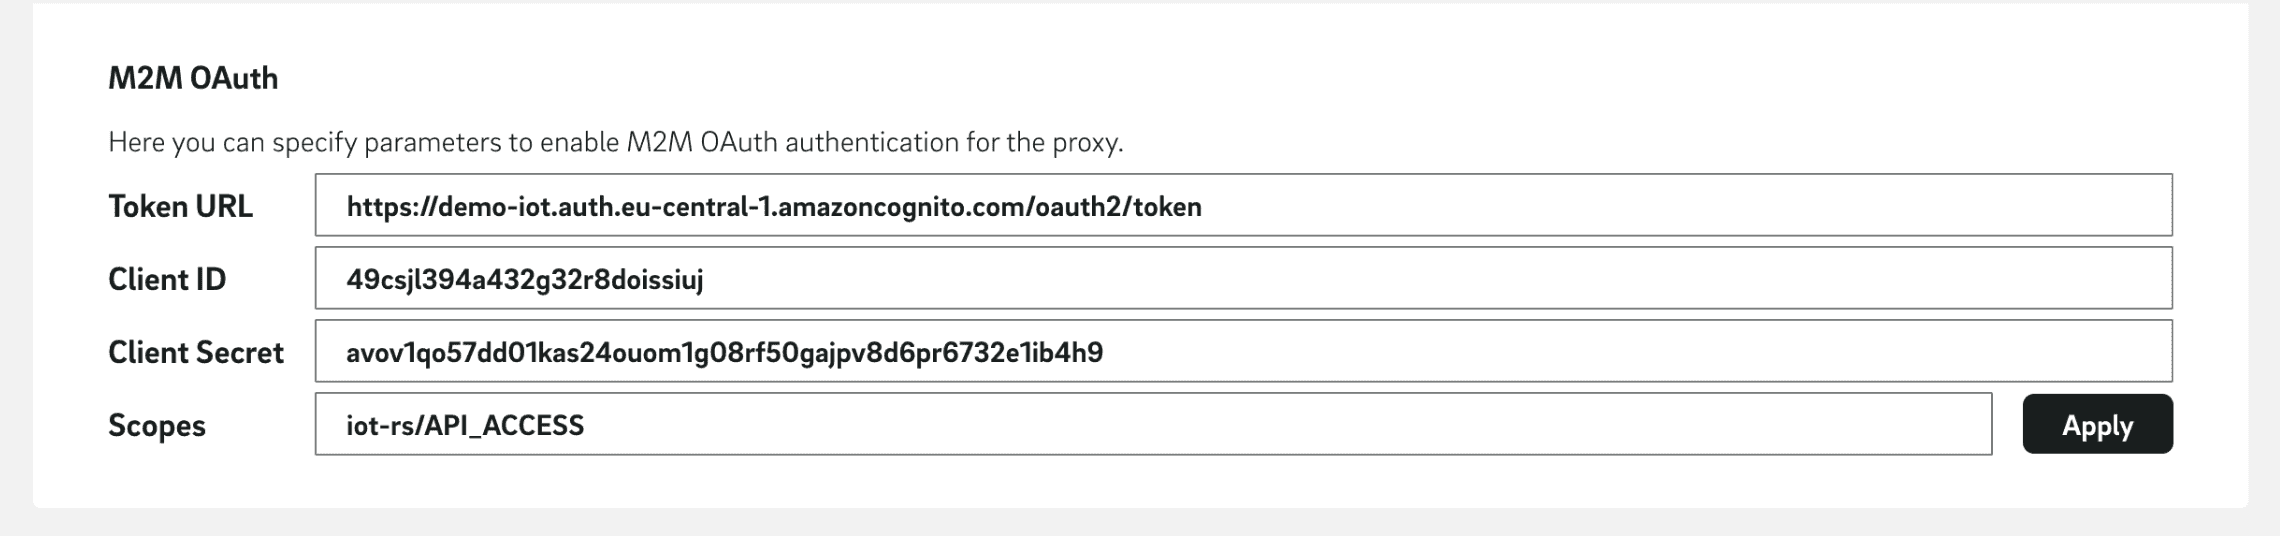
The second variant uses the M2M OAuth flow (also referred to client credentials flow). Here, the proxy uses predefined credentials (client ID and client secret) and scopes to retrieve a token via the token URL. The proxy uses this token accordingly for communication with the HTTP backend. If the token specifies an expires_in, the token is cached and not requested again until it expires. This prevents unnecessary latency and load on the IDP (Identity Provider). This variant can also be specified via the configuration page of the portal.
Proxy compared to direct communication
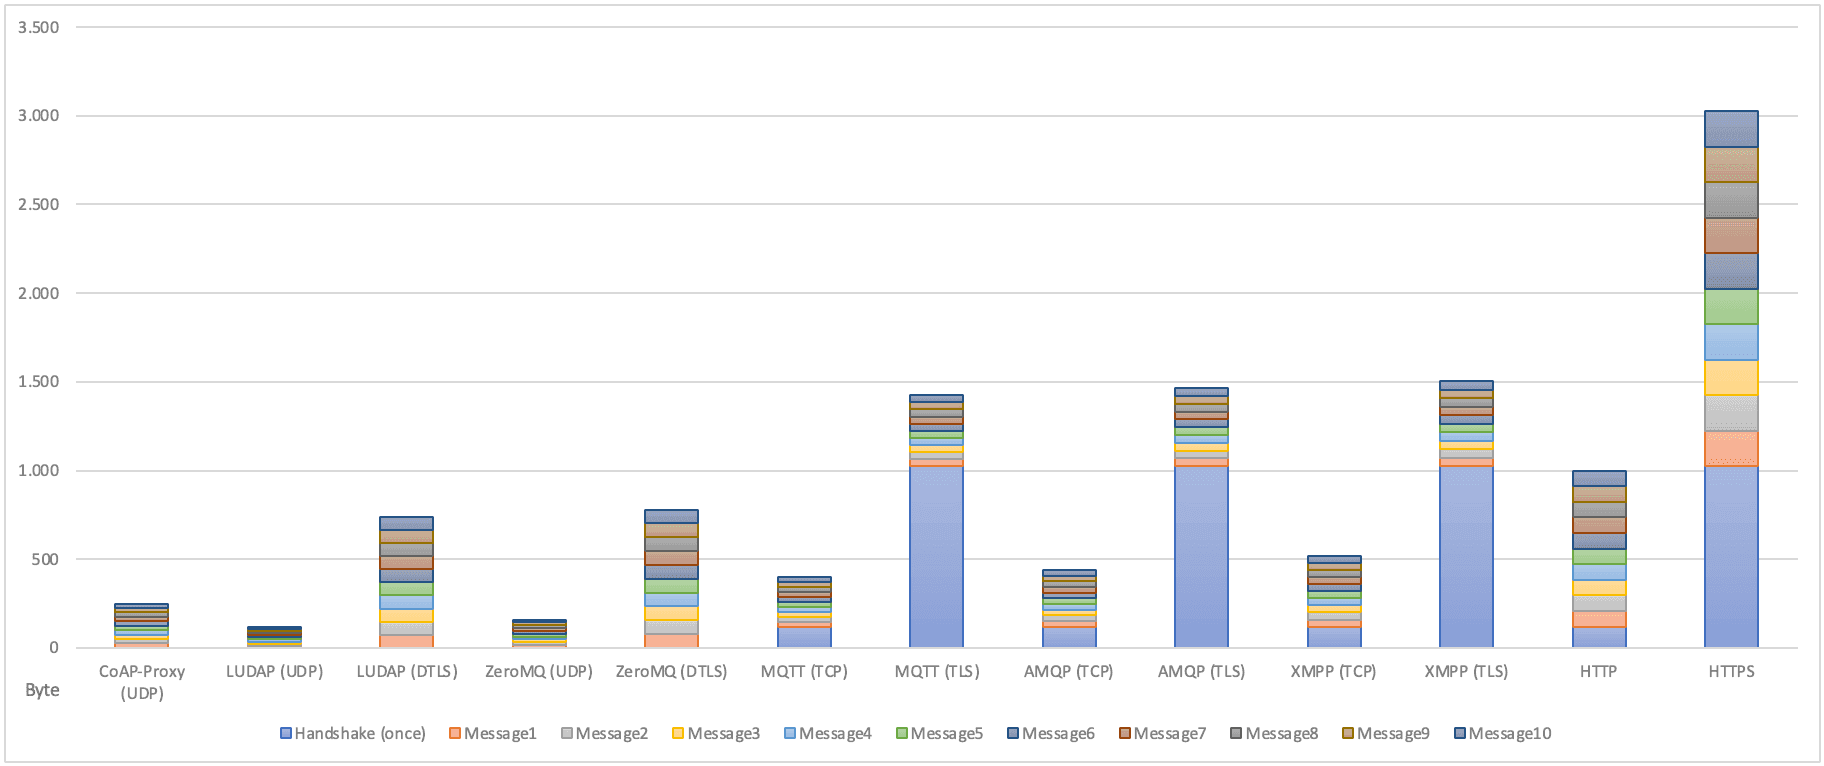
In the following, various alternatives to the CoAP proxy solution are compared in terms of the data volume per message. This is a purely theoretical consideration, as the actual values may vary in reality due to various parameters. The data is only used to illustrate the difference between those options.
We assume that a POST request is sent with the media type "text" and a payload of an integer value (4 bytes). The IP header, the case of lost messages, and the responses are not considered here. The TLS handshake usually requires between 1 kilobyte and 4 kilobytes, the TCP handshake 120 bytes, and the DTLS handshake between 50 bytes and 300 bytes. In our example, we add the smaller values in each case. So that the disadvantage of handshakes does not carry too much weight, the diagram illustrates a sequence of ten messages for an open connection.
It can be seen that CoAP is generally a sparse protocol. Since messages to the proxy travel over a secure tunnel, encrypted communication is not necessary. Even though the diagram includes UDP and TCP, unsecured communication over the Internet is not recommended. Therefore, the secured variants should be compared beforehand.
Header fields and mapping
Header fields
Custom header fields can be set globally in the configuration page of the portal. In addition to those header fields, the proxy sets additional default header fields. The table below lists the default header fields provided by the proxy. Please note that according to the HTTP/1.1 specification (RFC 7230), HTTP header field names are case-insensitive. This means that header field names can be written in uppercase, lowercase, or a combination of both, and the server should treat them as equivalent. For example, "X-Connect-ICCID" and "X-connect-iccid" refer to the same header field.
| Header | Description |
|---|---|
| X-Forwarded-For | Private IP address of the SIM card |
| X-Connect-ICCID | Integrated Circuit Card Identification Number |
| X-Connect-IMSI | International Mobile Subscriber Identity |
| Content-Type | Translated from CoAP message media type |
| Message-ID | Unique CoAP message |
HTTP Method to CoAP Code mapping
This table shows available methods with their equivalent.
| HTTP | CoAP code |
|---|---|
| GET | 1 |
| POST | 2 |
| PUT | 3 |
| DELETE | 4 |
HTTP Status Code to CoAP Codes mapping
The following table shows how HTTP status codes in responses are mapped onto CoAP codes.
| HTTP code | CoAP code |
|---|---|
| Continue - 100 | Continue - 95 |
| Switching Protocols - 101 | Switching Protocols - 128 |
| Processing - 102 | Processing - 67 |
| Early Hints - 103 | Early Hints - 67 |
| OK - 200 | ✶ |
| Created - 201 | Created - 65 |
| Accepted - 202 | Accepted - 67 |
| Non-Authoritative Information - 203 | Non-Authoritative Information - 129 |
| No Content - 204 | No Content - 0 |
| Reset Content - 205 | Reset Content - 66 |
| Partial Content - 206 | Partial Content - 95 |
| Multi-Status - 207 | Multi-Status - 67 |
| Already Reported - 208 | Already Reported - 67 |
| IM Used - 226 | IM Used - 67 |
| Multiple Choices - 300 | Multiple Choices - 130 |
| Moved Permanently - 301 | Moved Permanently - 132 |
| Found - 302 | Found - 67 |
| See Other - 303 | See Other - 128 |
| Not Modified - 304 | Not Modified - 67 |
| Use Proxy - 305 | Use Proxy - 132 |
| Temporary Redirect - 307 | Temporary Redirect - 132 |
| Permanent Redirect - 308 | Permanent Redirect - 132 |
| Bad Request - 400 | Bad Request - 128 |
| Unauthorized - 401 | Unauthorized - 129 |
| Payment Required - 402 | Payment Required - 128 |
| Forbidden - 403 | Forbidden - 131 |
| Not Found - 404 | Not Found - 132 |
| Method Not Allowed - 405 | Method Not Allowed - 133 |
| Not Acceptable - 406 | Not Acceptable - 134 |
| Proxy Authentication Required - 407 | Proxy Authentication Required - 129 |
| Request Timeout - 408 | Request Timeout - 157 |
| Conflict - 409 | Conflict - 128 |
| Gone - 410 | Gone - 128 |
| Length Required - 411 | Length Required - 128 |
| Precondition Failed - 412 | Precondition Failed - 140 |
| Request Entity Too Large - 413 | Request Entity Too Large - 141 |
| Request URI Too Long - 414 | Request URI Too Long - 141 |
| Unsupported Media Type - 415 | Unsupported Media Type - 143 |
| Requested Range Not Satisfiable - 416 | Requested Range Not Satisfiable - 128 |
| Expectation Failed - 417 | Expectation Failed - 128 |
| I'm a teapot - 418 | No content - 0 |
| Misdirected Request - 421 | Misdirected Request - 165 |
| Unprocessable Entity - 422 | Unprocessable Entity - 128 |
| Locked - 423 | Locked - 131 |
| Failed Dependency - 424 | Failed Dependency - 136 |
| Too Early - 425 | Too Early - 136 |
| Upgrade Required - 426 | Upgrade Required - 136 |
| Precondition Required - 428 | Precondition Required - 136 |
| Too Many Requests - 429 | Too Many Requests - 157 |
| Request Header Fields Too Large - 431 | Request Header Fields Too Large - 128 |
| Unavailable For Legal Reasons - 451 | Unavailable For Legal Reasons - 132 |
| Internal Server Error - 500 | Internal Server Error - 160 |
| Not Implemented - 501 | Not Implemented - 161 |
| Bad Gateway - 502 | Bad Gateway - 162 |
| Service Unavailable - 503 | Service Unavailable - 163 |
| Gateway Timeout - 504 | Gateway Timeout - 164 |
| HTTP Version Not Supported - 505 | HTTP Version Not Supported - 128 |
| Variant Also Negotiates - 506 | Variant Also Negotiates - 160 |
| Insufficient Storage - 507 | Insufficient Storage - 160 |
| Loop Detected - 508 | Loop Detected - 160 |
| Not Extended - 510 | Not Extended - 130 |
| Network Authentication Required - 511 | Network Authentication Required - 129 |
✶ If the server responds 200 (OK), the mapping variants based on the initial CoAP request code/method. The table below shows the CoAP code you can expect if the server responds 200.
| Method | CoAP code |
|---|---|
| GET - 1 | Content - 69 |
| POST - 2 | Created - 65 |
| PUT - 3 | Changed - 68 |
| DELETE - 4 | Deleted - 66 |
HTTP Content Type to CoAP Media Type mapping
The following tables shows how CoAP Media Type and HTTP Content Type request and response are mapped by the proxy.
| Content Type (HTTP) | Media Type (CoAP) |
|---|---|
| - | App Octets- 42 |
| application/coap-payload | - |
| text/plain | Text Plain - 0 |
| text/plain;charset=utf-8 | Text Plain - 0 |
| application/cose; cose-type="cose-encrypt0" | App Cose Encrypt0 - 96 |
| application/cose; cose-type="cose-mac0" | App Cose Mac0 - 97 |
| application/cose; cose-type="cose-sign1" | App Cose Sign1 - 98 |
| application/link-format | App Link Format - 40 |
| application/xml | App XML - 41 |
| application/octet-stream | App Octets - 42 |
| application/exi | App Exi - 47 |
| application/json | App JSON - 50 |
| application/json-patch+json | App JSON Patch - 51 |
| application/merge-patch+json | App JSON Merge Patch - 52 |
| application/cbor | App CBOR - 60 |
| application/cwt | App CWT - 61 |
| application/cose; cose-type="cose-encrypt" | App Cose Encrypt - 96 |
| application/cose; cose-type="cose-mac" | App Cose Mac - 97 |
| application/cose; cose-type="cose-sign" | App Cose Sign - 98 |
| application/cose-key | App Cose Key - 101 |
| application/cose-key-set | App Cose Key Set - 102 |
| application/senml+json | App Senml JSON - 110 |
| application/senml+cbor | App Senml Cbor - 112 |
| coap-group+json | App Coap Group - 256 |
| application/senml-etch+json | App Senml Etch JSON - 320 |
| application/senml-etch+cbor | App Senml Etch Cbor - 322 |
| application/vnd.ocf+cbor | App Ocf Cbor - 10000 |
| application/vnd.oma.lwm2m+tlv | App Lwm2m TLV - 11542 |
| application/vnd.oma.lwm2m+json | App Lwm2m JSON - 11543 |
| application/vnd.oma.lwm2m+cbor | App Lwm2m Cbor - 11544 |
Simulating a request
Sometimes a backend is developed before the hardware even exists, it is not decided how the backend handles requests or a simple configuration or connectivity test is required. In such cases, a simulation endpoint is provided, enabling the simulation of CoAP requests using a specified proxy configuration and CoAP request parameters.

For the execution of the request, the configuration page is utilized to retrieve the Target URL and HTTP header fields, while the CoAP parameters path, body, code, and media type are obtained from the corresponding pop-up. Simulated requests are treated in the same manner as regular CoAP requests, with the requirement that the body must be encoded as a Base64 string (the decoded content is transmitted by the proxy).
Examples
MS Teams message
Various chatbot webhooks can be used via proxies, such as from MS or Webex Teams. This example illustrates how to generate MS Teams messages using CoAP messages. This can be handy if there is no backend at the current time and IoT device developers want to see their messages. Of course, it is important to keep in mind that the messages must be in a format that Teams can understand.
{"text": "Hello World"}
Webhook setup
Within MS Teams, the desired group chat is selected first. Under the menu "---" the tab "Connectors" is called. There you search for "Incoming Webhook" and add it to the chat with "Add". Under certain circumstances, the window closes. In this case, open the "Connectors" tab again and then press "Configure" next to "Incoming Webhook". On this configuration page, specify a name and an optional image. Then confirm with "Create" and copy the URL to a file or your notes. This URL is the webhook URL you will need in the following steps.
An introduction from Microsoft itself can be found here: https://learn.microsoft.com/en-us/microsoftteams/platform/webhooks-and-connectors/how-to/add-incoming-webhook?tabs=dotnet.
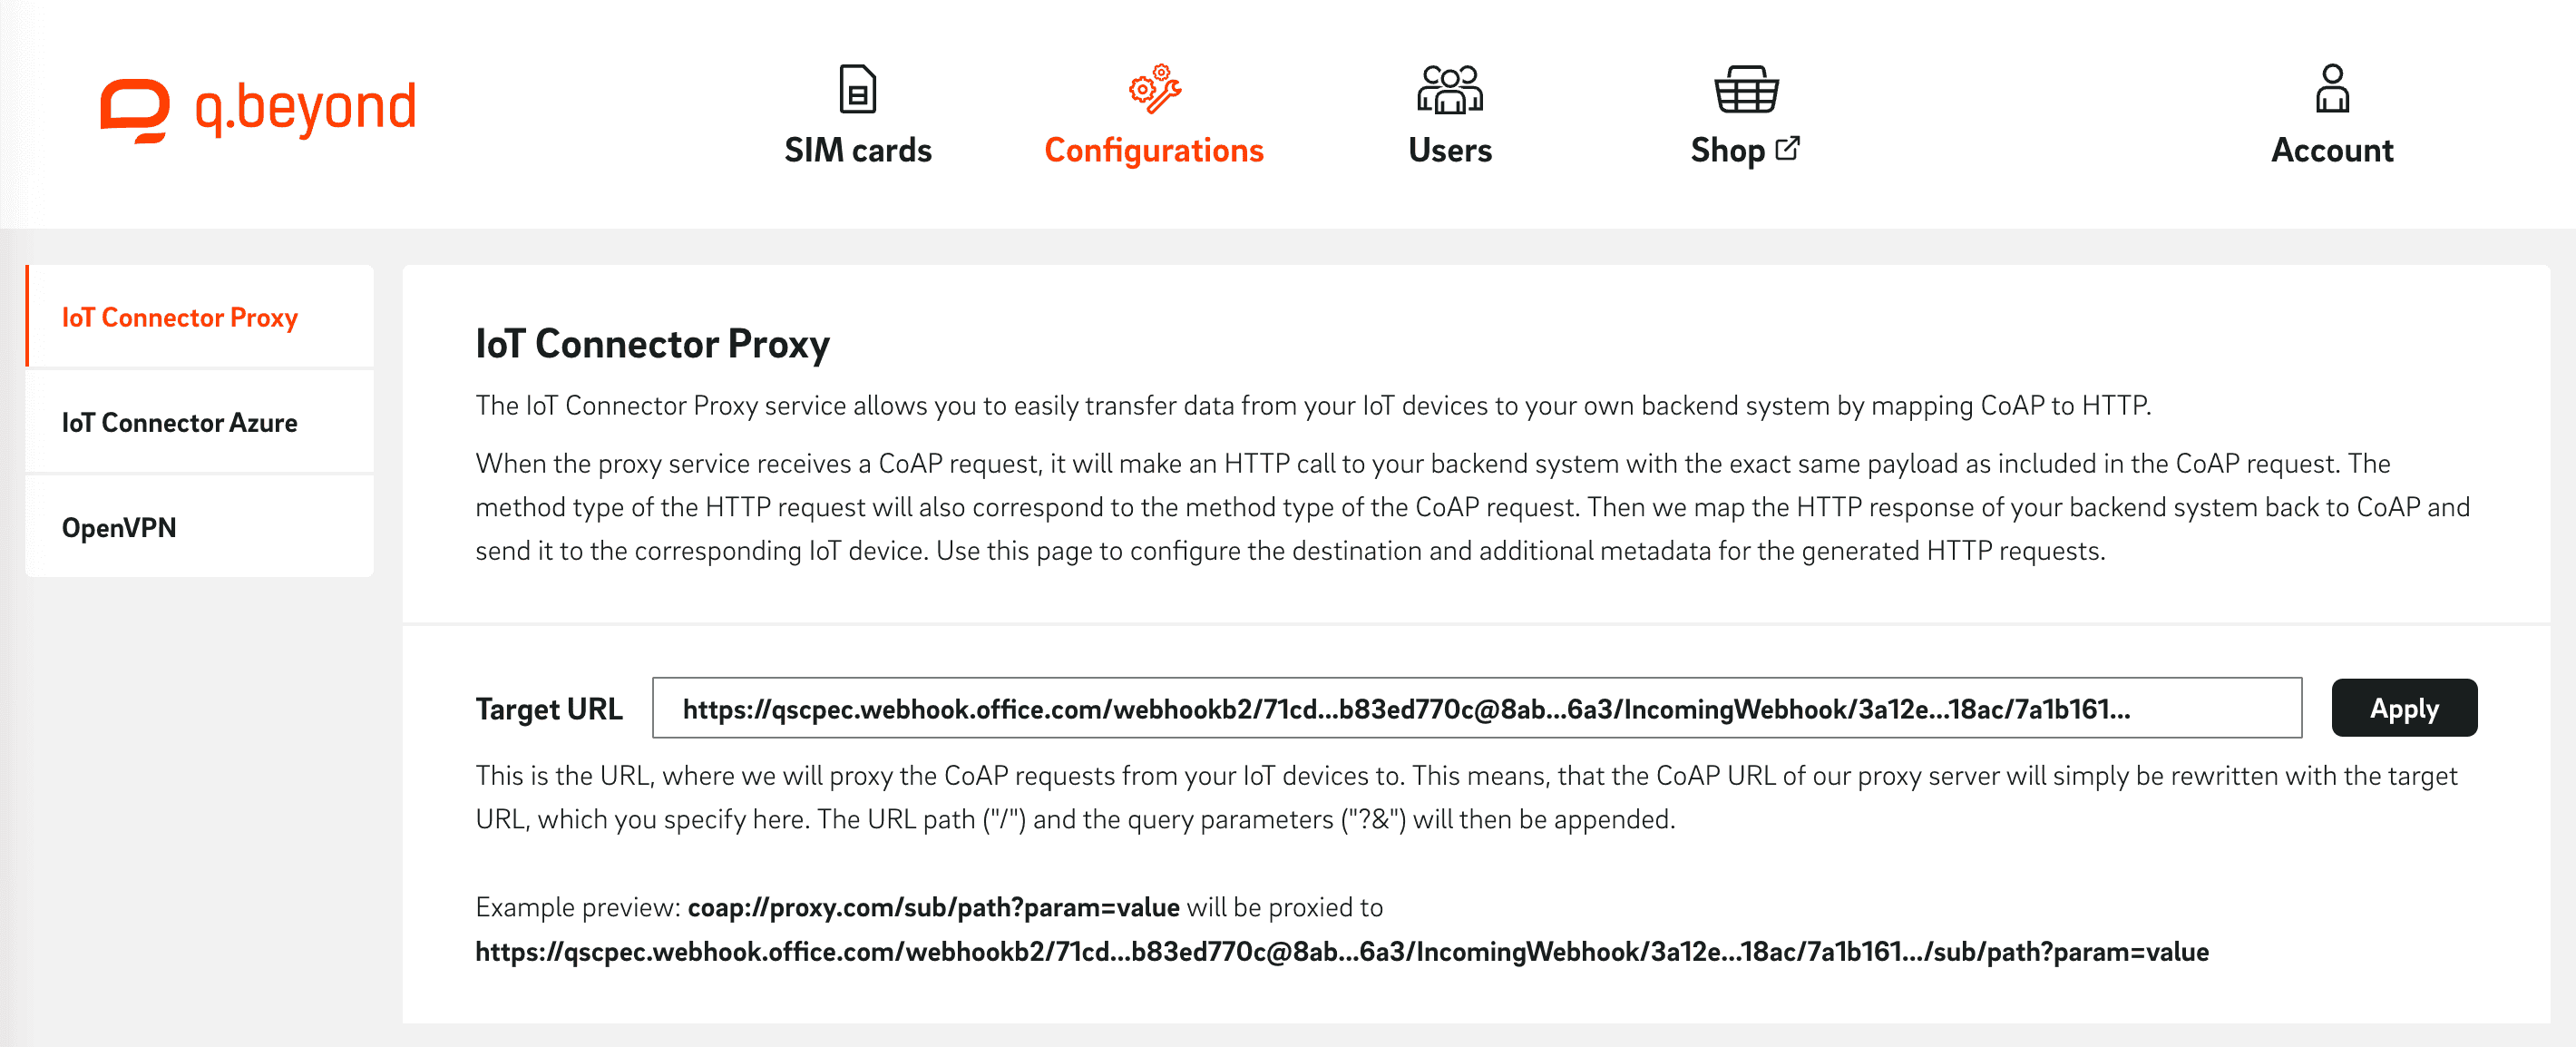
Configure Proxy
In this step, you store the previously generated webhook URL in the proxy configuration. To do this, open the IoT SIM portal, navigate to the "Configurations" tab, and select "IoT Connector Proxy". Paste the previously generated webhook URL into the text field next to "Target URL" and confirm the entry with "Apply".
Send CoAP messages
The IoT device can now send messages to the proxy using CoAP, which are then forwarded to the MS Connector. The URL of the proxy is coap://proxy.connect-internal.iot-sim.tech:5683 (only accessible from the network of IoT SIM). For a first test, the body of the message can contain the following JSON data:
{"text": "Hello World"}Depending on the hardware, external libraries may have to be used for CoAP. In this example, we use an ESP-32 from ESPRESSIF with the CoAP-simple-library library.
// numberLines:true
#include <SoftwareSerial.h>
#include <coap-simple.h>

// Software serial pins for SIM800L module
#define rxPin 16
#define txPin 17
SoftwareSerial sim800lSerial(txPin, rxPin);

// CoAP server endpoint
const char* serverEndpoint = "coap://proxy.connect.iotsim.tech:5683";

void setup() {
  // Initialize software serial for SIM800L module
  sim800lSerial.begin(9600);
  while(!sim800lSerial);

  // Turn on SIM800L module
  sim800lSerial.println("AT");
  delay(1000);
  sim800lSerial.println("AT+CPIN?");
  delay(1000);
  sim800lSerial.println("AT+CREG?");
  delay(1000);
  sim800lSerial.println("AT+CGATT=1");
  delay(1000);

  // Initialize CoAP client
  coap_client_init();

  // Set CoAP server endpoint
  coap_client_set_server_endpoint(serverEndpoint);

  // Connect to GPRS network
  connectGPRS()

  // Send CoAP message to proxy
  sendCoAP("{\"text\": \"Hello World\"}")

  // Disconnect from GPRS network
  disconnectGPRS()
}

void connectGPRS() {
  sim800lSerial.println("AT+CIPSHUT");
  delay(1000);
  sim800lSerial.println("AT+CIPMUX=0");
  delay(1000);
  // sim800lSerial.println("AT+CSTT=\"your_APN\",\"your_USERNAME\",\"your_PASSWORD\"");
  // delay(1000);
  sim800lSerial.println("AT+CIICR");
  delay(1000);
  sim800lSerial.println("AT+CIFSR");
  delay(1000);
}

void disconnectGPRS() {
  sim800lSerial.println("AT+CIPSHUT");
  delay(1000);
}

void sendCoAP(char* payload) {
  // Send
  coap_pdu_t pdu;
  coap_pdu_reset(&pdu);
  coap_add_option(&pdu, COAP_OPTION_CONTENT_TYPE, COAP_CONTENT_TYPE_APPLICATION_JSON);
  coap_send_post(&pdu, (uint8_t*)payload, strlen(payload));

  // Await and print response
  coap_wait_response();
  Serial.print("CoAP response: ");
  Serial.write((char*)pdu.payload, pdu.payload_len);
  Serial.println();
}

void loop() {}
The messages can also be made fancier using Cards. For more information, visit https://learn.microsoft.com/en-us/microsoftteams/platform/webhooks-and-connectors/how-to/connectors-using?tabs=cURL.
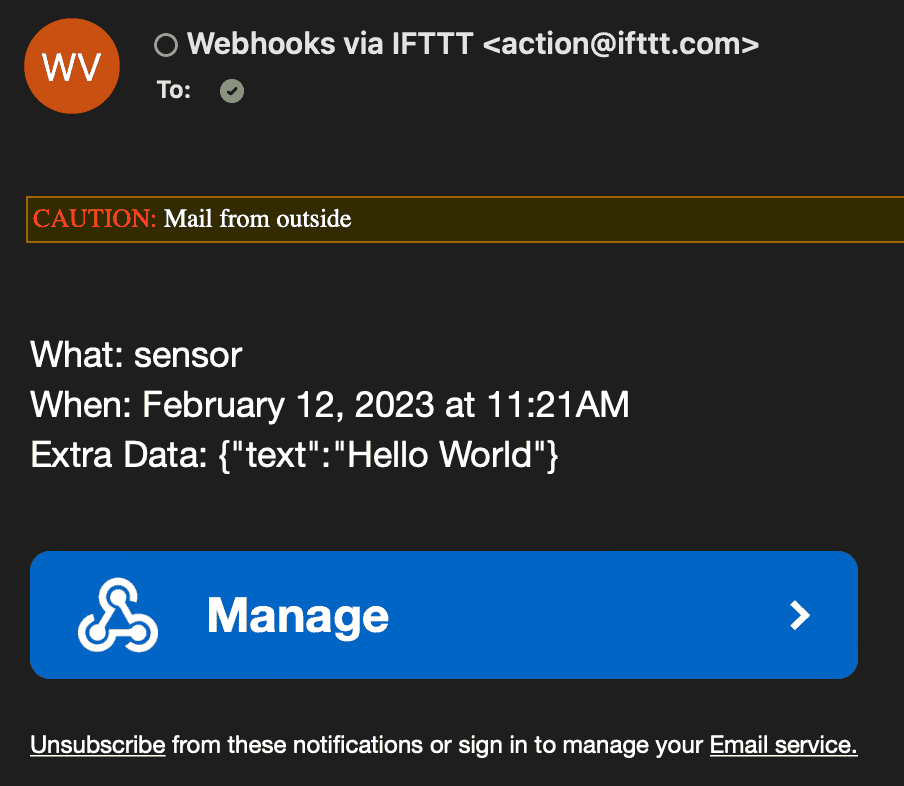
Sending e-mails via IFTTT
IFTTT (If This Then That) is a web and mobile application, some of which are free, that enables connections between various online services and devices. So-called "applets" are used to set up these connections. In this example, you use an applet that automatically triggers an action (email) when a certain trigger (webhook) occurs.
Create an account and applet
First of all, an account with IFTTT is required. Follow the current process of IFTTT.
Once you are logged in, you can use various predefined applets under "My Applets" or simply create your own. It is only important that you select "Webhooks" accordingly under "If This" (entry point). For example, you can specify "sensor" as the "Event Name". Under "Then That" (starting point) you can specify a subsequent action on the trigger, such as "Email". This should look like this:
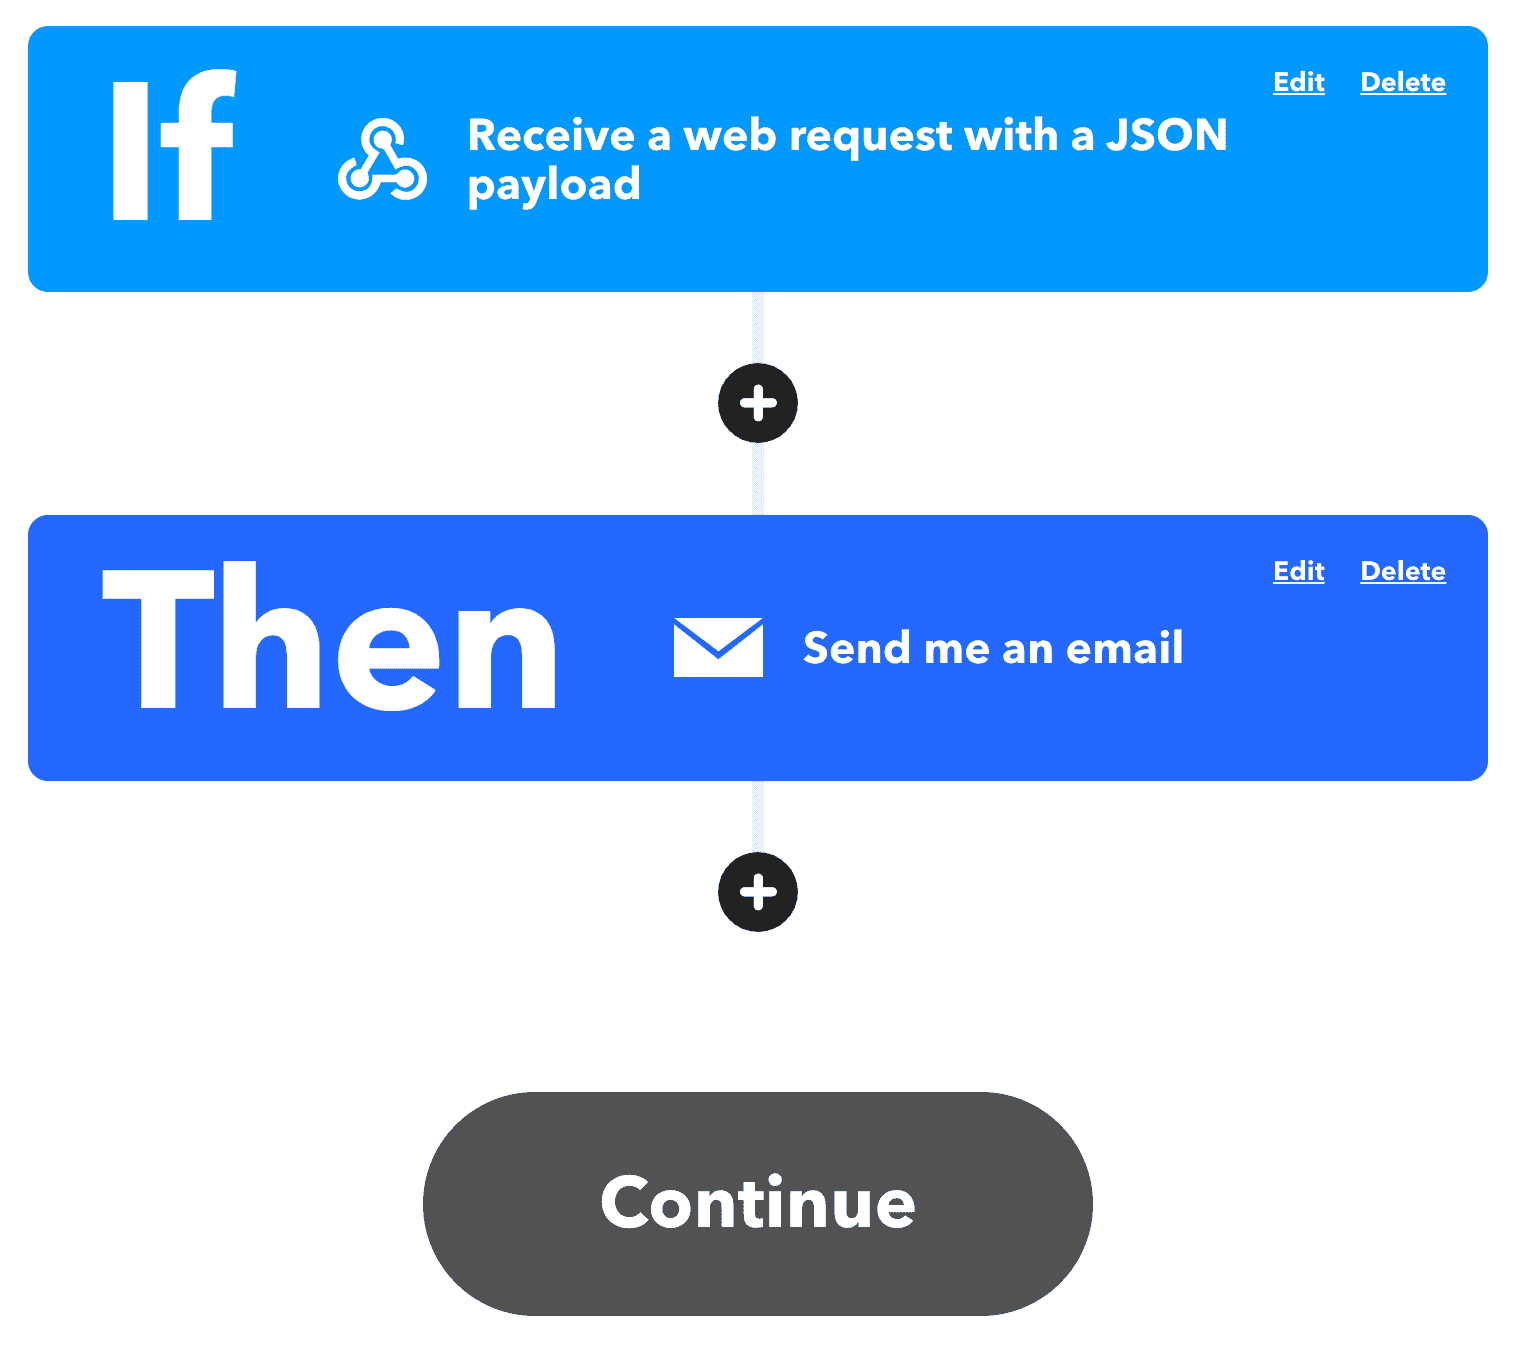
Confirm the setting with "Continue" and "Finish". To get the webhook URL you have to go to the following page https://ifttt.com/maker_webhooks and then press "Documentation". There enter the "Event Name" of the webhook under "{event}" and then copy the URL shown in the example.
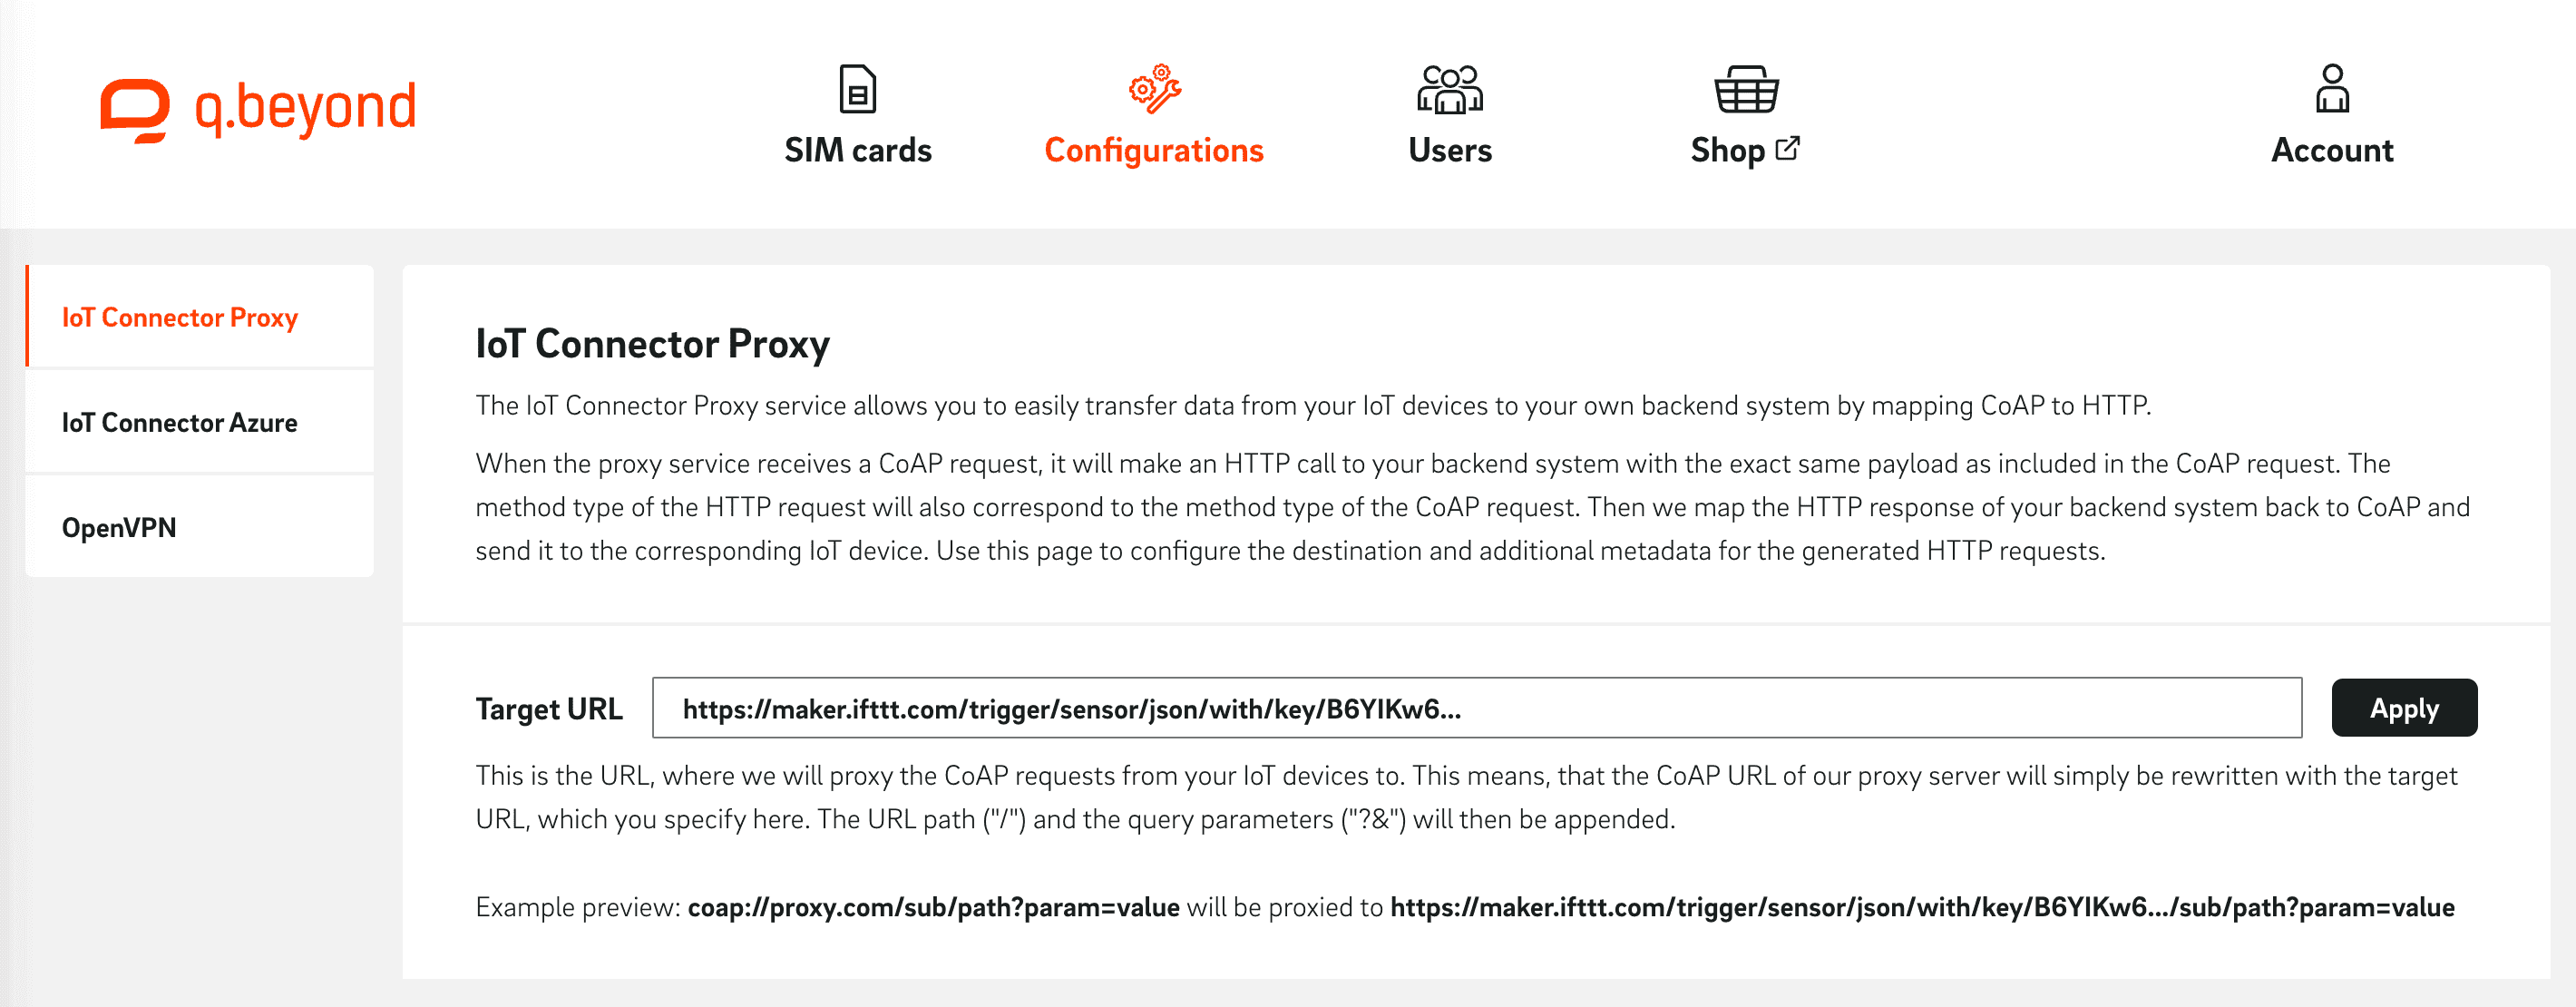
Configure proxy
In this step, we store the previously generated webhook URL in the proxy configuration. To do this, open the IoT SIM portal, navigate to the "Configurations" tab, and select "IoT Connector Proxy" there. Paste the previously generated webhook URL into the text field next to "Target URL" and confirm the entry with "Apply".
Send CoAP messages
The IoT device can now send messages to the proxy using CoAP, which are then passed to the applet webhook. The URL of the proxy is coap://proxy.connect-internal.iot-sim.tech:5683 (only accessible from IoT SIM's network). For a first test, the body of the message can contain the following JSON data:
{"text": "Hello World"}Depending on the hardware, external libraries may have to be used for CoAP. In this example, we use an ESP-32 from ESPRESSIF with the CoAP-simple-library library.
#include <SoftwareSerial.h>
#include <coap-simple.h>

// Software serial pins for SIM800L module
#define rxPin 16
#define txPin 17
SoftwareSerial sim800lSerial(txPin, rxPin);

// CoAP server endpoint
const char* serverEndpoint = "coap://proxy.connect.iotsim.tech:5683";

void setup() {
  // Initialize software serial for SIM800L module
  sim800lSerial.begin(9600);
  while(!sim800lSerial);

  // Turn on SIM800L module
  sim800lSerial.println("AT");
  delay(1000);
  sim800lSerial.println("AT+CPIN?");
  delay(1000);
  sim800lSerial.println("AT+CREG?");
  delay(1000);
  sim800lSerial.println("AT+CGATT=1");
  delay(1000);

  // Initialize CoAP client
  coap_client_init();

  // Set CoAP server endpoint
  coap_client_set_server_endpoint(serverEndpoint);

  // Connect to GPRS network
  connectGPRS()

  // Send CoAP message to proxy
  sendCoAP("{\"text\": \"Hello World\"}")

  // Disconnect from GPRS network
  disconnectGPRS()
}

void connectGPRS() {
  sim800lSerial.println("AT+CIPSHUT");
  delay(1000);
  sim800lSerial.println("AT+CIPMUX=0");
  delay(1000);
  // sim800lSerial.println("AT+CSTT=\"your_APN\",\"your_USERNAME\",\"your_PASSWORD\"");
  // delay(1000);
  sim800lSerial.println("AT+CIICR");
  delay(1000);
  sim800lSerial.println("AT+CIFSR");
  delay(1000);
}

void disconnectGPRS() {
  sim800lSerial.println("AT+CIPSHUT");
  delay(1000);
}

void sendCoAP(char* payload) {
  // Send
  coap_pdu_t pdu;
  coap_pdu_reset(&pdu);
  coap_add_option(&pdu, COAP_OPTION_CONTENT_TYPE, COAP_CONTENT_TYPE_APPLICATION_JSON);
  coap_send_post(&pdu, (uint8_t*)payload, strlen(payload));

  // Await and print response
  coap_wait_response();
  Serial.print("CoAP response: ");
  Serial.write((char*)pdu.payload, pdu.payload_len);
  Serial.println();
}

void loop() {}
The service can sometimes take a few seconds to minutes for an email to arrive. Check your spam folder as well if necessary.
Lambda API for time synchronization with Basic Auth
This example creates a simple Lambda function that looks for an "Authorization" header and returns the current time in Unix seconds accordingly. The basics of Lambda are not considered. For more information and a similar example, see the AWS course "Run a Serverless "Hello, World!" with AWS Lambda".
Lambda Function
For this example, we will set up a small Lambda function using Python. The basic idea is that requests with the "Authorization" header "Bearer user:passwd" will receive the current time in Unix-Nano format as a response. Otherwise, an "Unauthorized" should be returned. For the newly created Lambda function, you still need a "Function URL". How to do that is described here.
import time

def lambda_handler(event, context):
    # Get the headers from the event object
    headers = event.get('headers', {})

    # Check if the Authorization header exists and has the correct value
    if headers.get('Authorization') == 'Bearer user:passwd':
        # Return the current timestamp in Unix seconds format
        return {'statusCode': 200, 'body': str(int(time.time()))}
    else:
        # Return an error message if the header is missing or incorrect
        return {'statusCode': 401, 'body': 'Unauthorized'}
Configure proxy
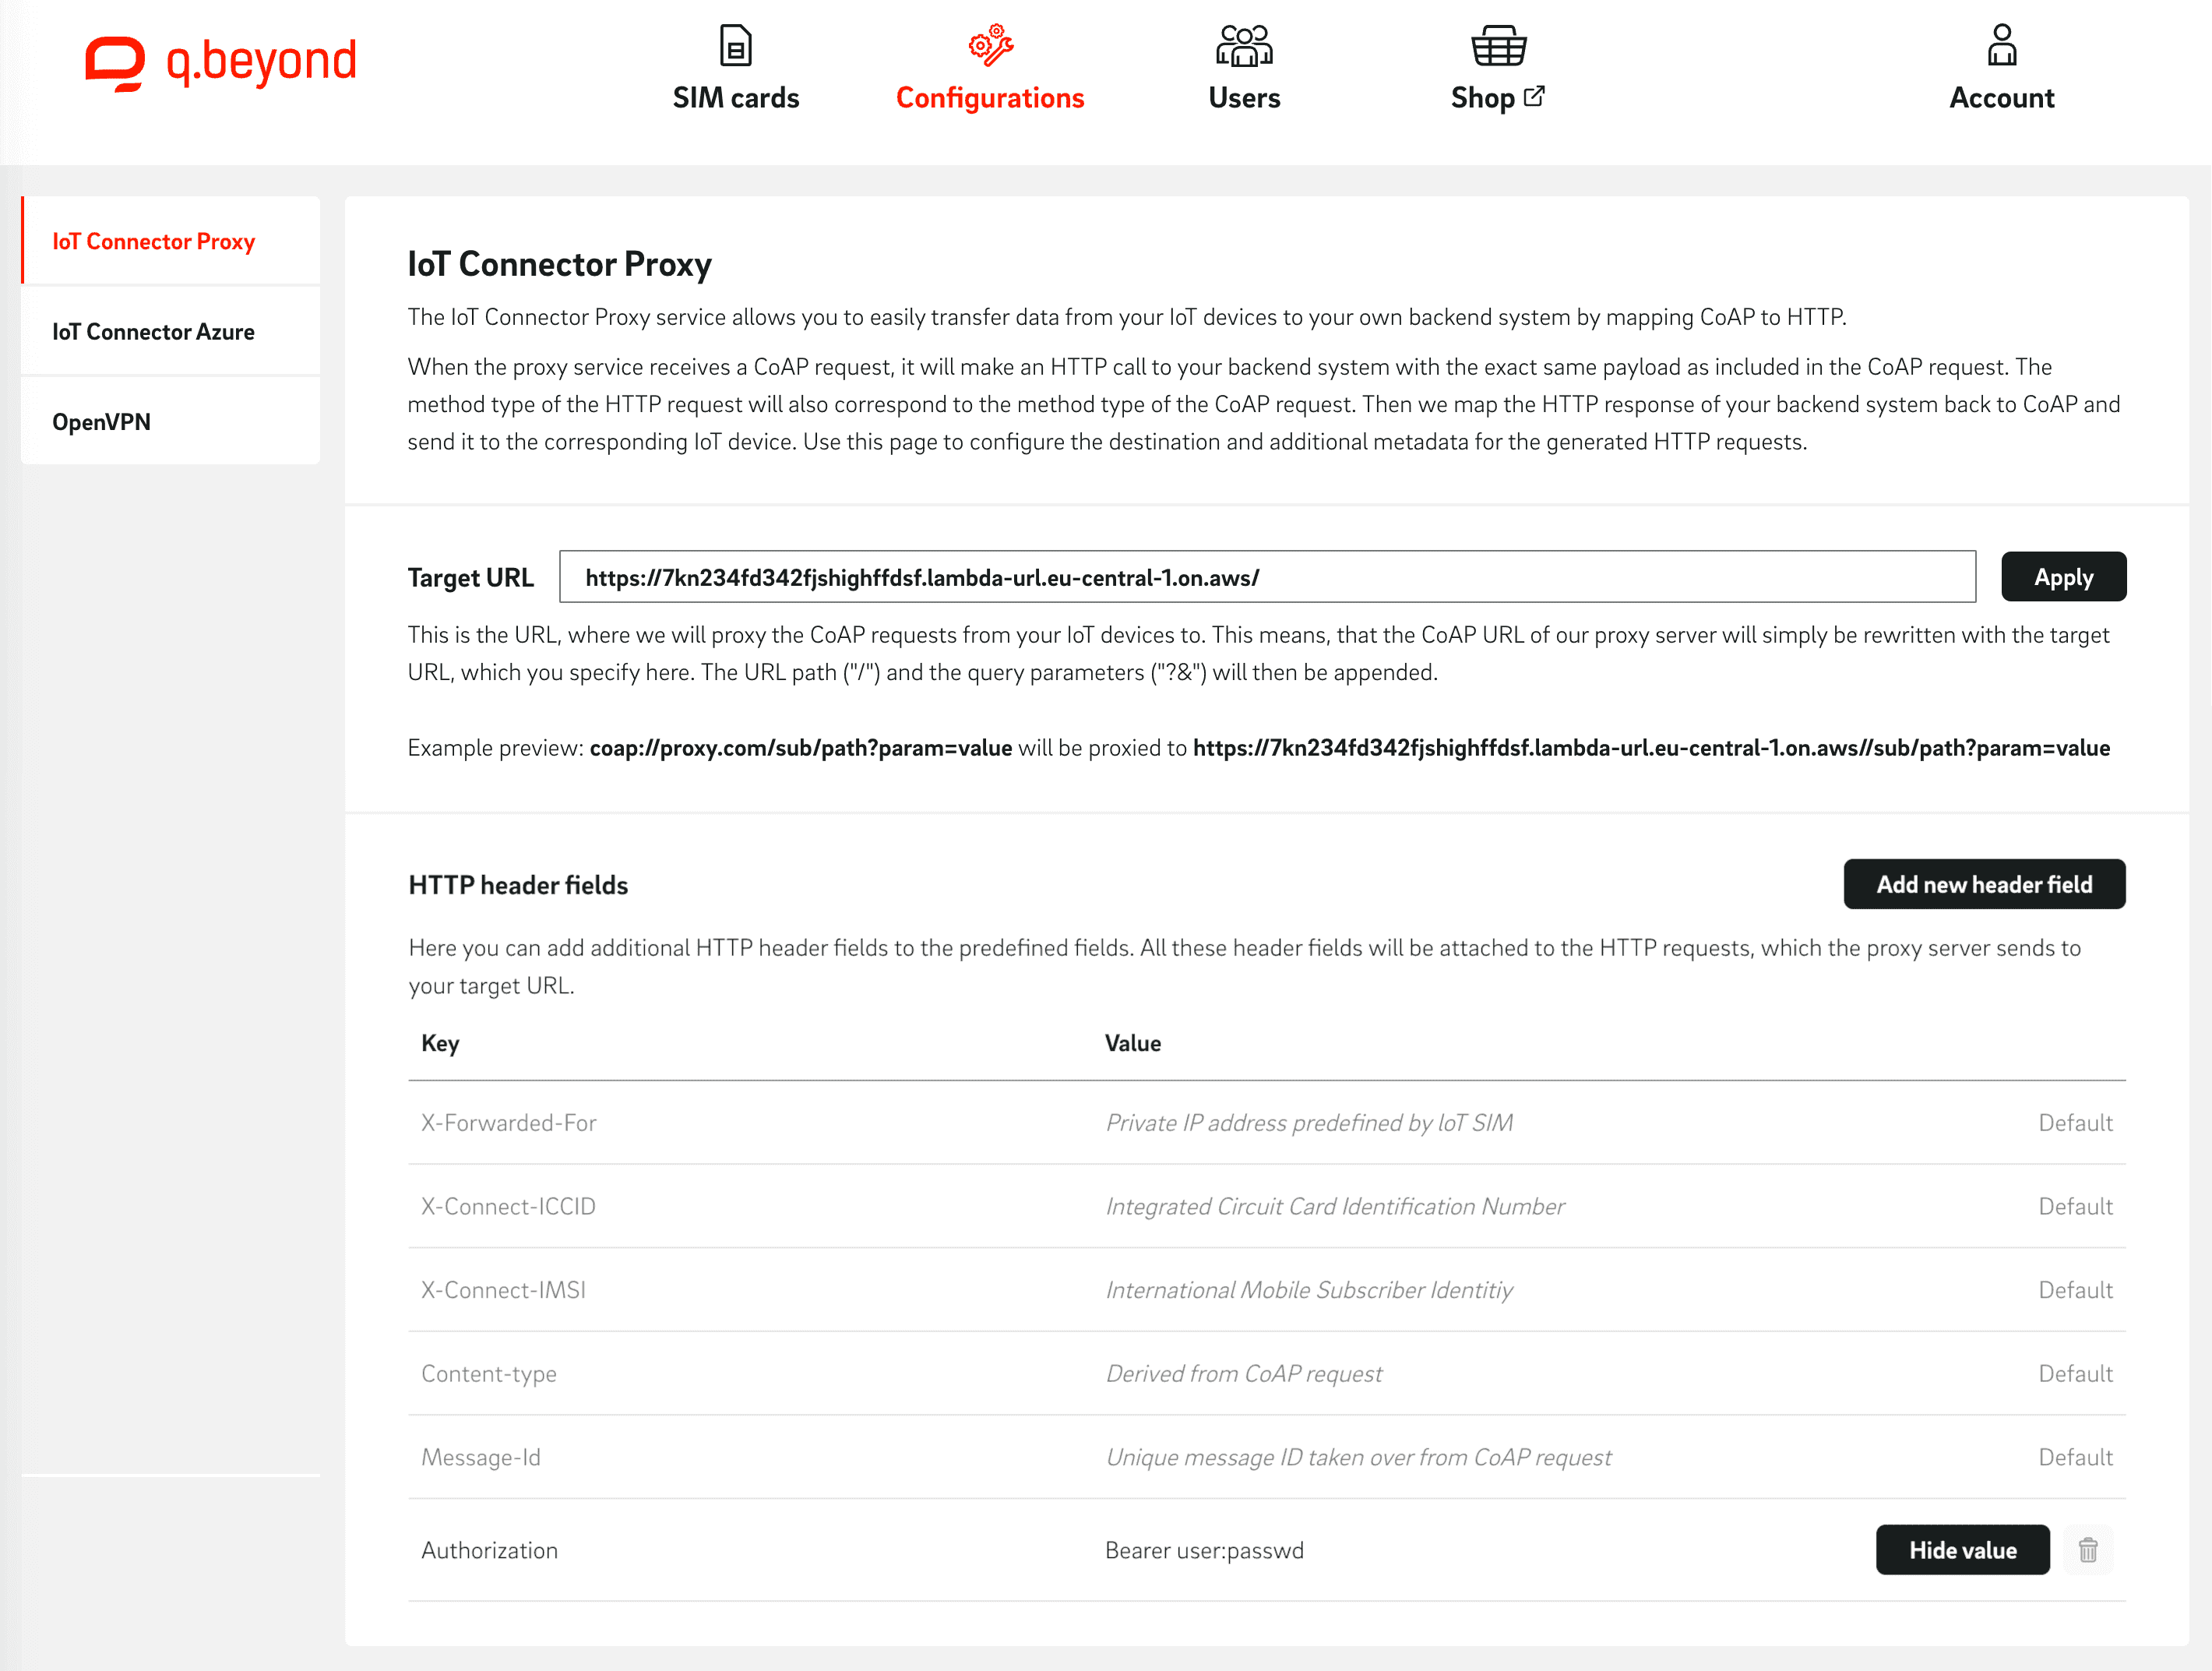
In this step, we store the previously generated function URL and the required "Authorization" header in the proxy configuration. To do this, open the IoT SIM portal, navigate to the "Configurations" tab, and select "IoT Connector Proxy". Paste the previously created "Function URL" into the text field next to "Target URL" and confirm the entry with "Apply". Then enter the "Authorization" header. To do this, first press "Add new header field" and enter "Authorization" as the Key and "Bearer user:passwd" as the Value.
Send CoAP messages
The IoT device can now send messages to the proxy using CoAP, which are then passed on to the Lambda function with the appropriate URL and the Authorization header. The URL of the proxy is coap://proxy.connect-internal.iot-sim.tech:5683 (only accessible from the network of IoT SIM).
#include <SoftwareSerial.h>
#include <coap-simple.h>
#include <ESP32Time.h>

// Software serial pins for SIM800L module
#define rxPin 16
#define txPin 17
SoftwareSerial sim800lSerial(txPin, rxPin);

// CoAP server endpoint
const char* serverEndpoint = "coap://proxy.connect.iotsim.tech:5683";

void setup() {
  // Initialize software serial for SIM800L module
  sim800lSerial.begin(9600);
  while(!sim800lSerial);

  // Turn on SIM800L module
  sim800lSerial.println("AT");
  delay(1000);
  sim800lSerial.println("AT+CPIN?");
  delay(1000);
  sim800lSerial.println("AT+CREG?");
  delay(1000);
  sim800lSerial.println("AT+CGATT=1");
  delay(1000);

  // Initialize CoAP client
  coap_client_init();

  // Set CoAP server endpoint
  coap_client_set_server_endpoint(serverEndpoint);

  // Connect to GPRS network
  connectGPRS()

  // Request time with CoAP message via proxy and set system time
  syncTime()

  // Disconnect from GPRS network
  disconnectGPRS()
}

void connectGPRS() {
  sim800lSerial.println("AT+CIPSHUT");
  delay(1000);
  sim800lSerial.println("AT+CIPMUX=0");
  delay(1000);
  // sim800lSerial.println("AT+CSTT=\"your_APN\",\"your_USERNAME\",\"your_PASSWORD\"");
  // delay(1000);
  sim800lSerial.println("AT+CIICR");
  delay(1000);
  sim800lSerial.println("AT+CIFSR");
  delay(1000);
}

void disconnectGPRS() {
  sim800lSerial.println("AT+CIPSHUT");
  delay(1000);
}

void syncTime() {
  // Send
  coap_pdu_t pdu;
  coap_pdu_reset(&pdu);
  oap_send_get(&pdu);

  // Await and print response
  coap_wait_response();
  Serial.print("Remote time (unix-second): ");
  Serial.write((char*)pdu.payload, pdu.payload_len);
  Serial.println();

  // Set time
  setTime(atoi((char *)pdu.payload));
}

void loop() {}
Calling API with M2M OAuth
This example shows how to use M2M OAuth (also referred to client credentials flow) with AWS Cognito as the IDP. If you want to use a different IDP for your HTTP backend, such as Keycloak, the setup may differ accordingly.
Set up Cognito
To begin, you need to set up Cognito. Using the AWS Console, navigate to the "Amazon Cognito" service and create a "User Pool" with "Add user directories to your app". On the following pages, select the "User name" option as the sign-in option ("Cognito user pool sign-in options"), disable MFA ("Multi-factor authentication"), and self-registration ("Self-registration"). Since no registration is required, the option "Send an email with Cognito" is selected under "Email". For App Integration, a name for the user pool and app client (this client is not required) is defined.
Then open the newly created user pool and navigate to "App integration". Here you first create a "domain" via "Actions"→"Create Cognito domain". As a prefix, enter a unique text, such as https://demo-iot. This will give you a domain https://demo-iot.auth.eu-central-1.amazoncognito.com. Next, you need a resource server with a scope, which you create via "Create resource server". For example, you can name it iot-rs and set the "Resource server identifier" to iot-rs. Last but not least, create a scope with the name API_ACCESS under "Custom Scope".
Now you only need a user. First, you can delete the automatically created user under "App clients and analytics" and create a new one with "Create app client". For this, select the "App type" "Confidential Client" and give it a name, e.g. proxy. Under "Authentication flows" you can remove all selected options as well as under "Hosted UI settings" the "URL". You must select the option "Client credentials" for "OAuth 2.0 grant types". Finally, give the user the "Custom scope" you created (iot-rs/API_ACCESS in the example). If you now select the user, you can retrieve the client ID and the client secret. So far the setup is complete.
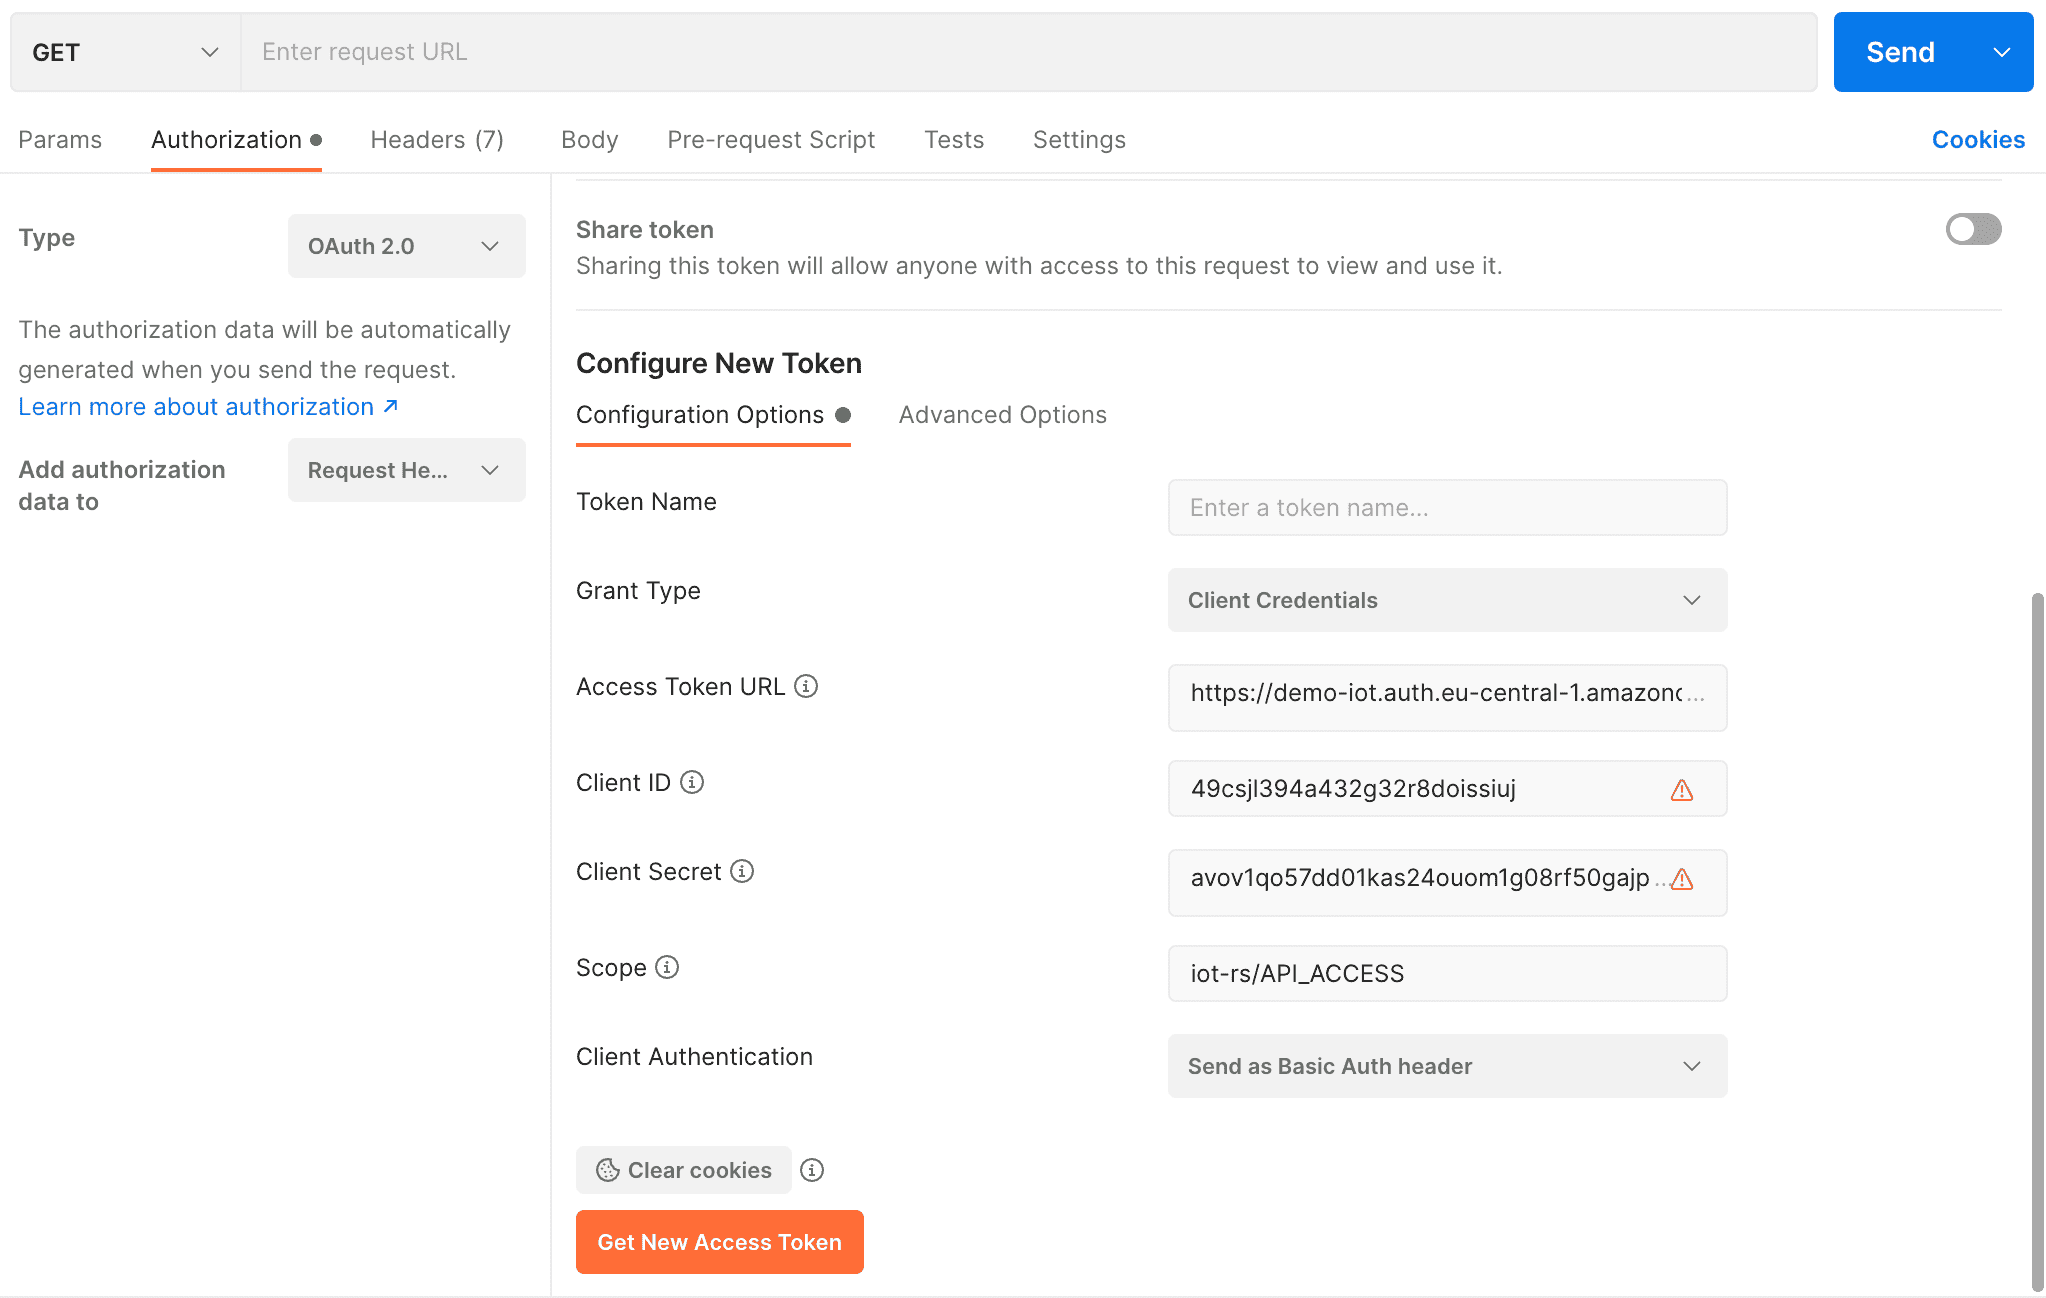
To test the configuration, you can use Postman for example. To do this, open a new Request tab and under it the "Authorization" tab. Under "Type", "OAuth 2.0" is selected. On the configuration page, first set the "Grant Type" to "Client Credentials". Under "Access Token URL" enter your domain URL of the user pool with the postfix /oauth2/token, which in this example corresponds to the URL https://demo-iot.auth.eu-central-1.amazoncognito.com/oauth2/token. In addition, the generated client ID and the client secret as well as the scope are entered. The scope is composed of the "Resource server identifier" + / + scope name, which in our example corresponds to iot-rs/API_ACCESS. As soon as you press "Get New Access Token" you should get a token.
Configure proxy
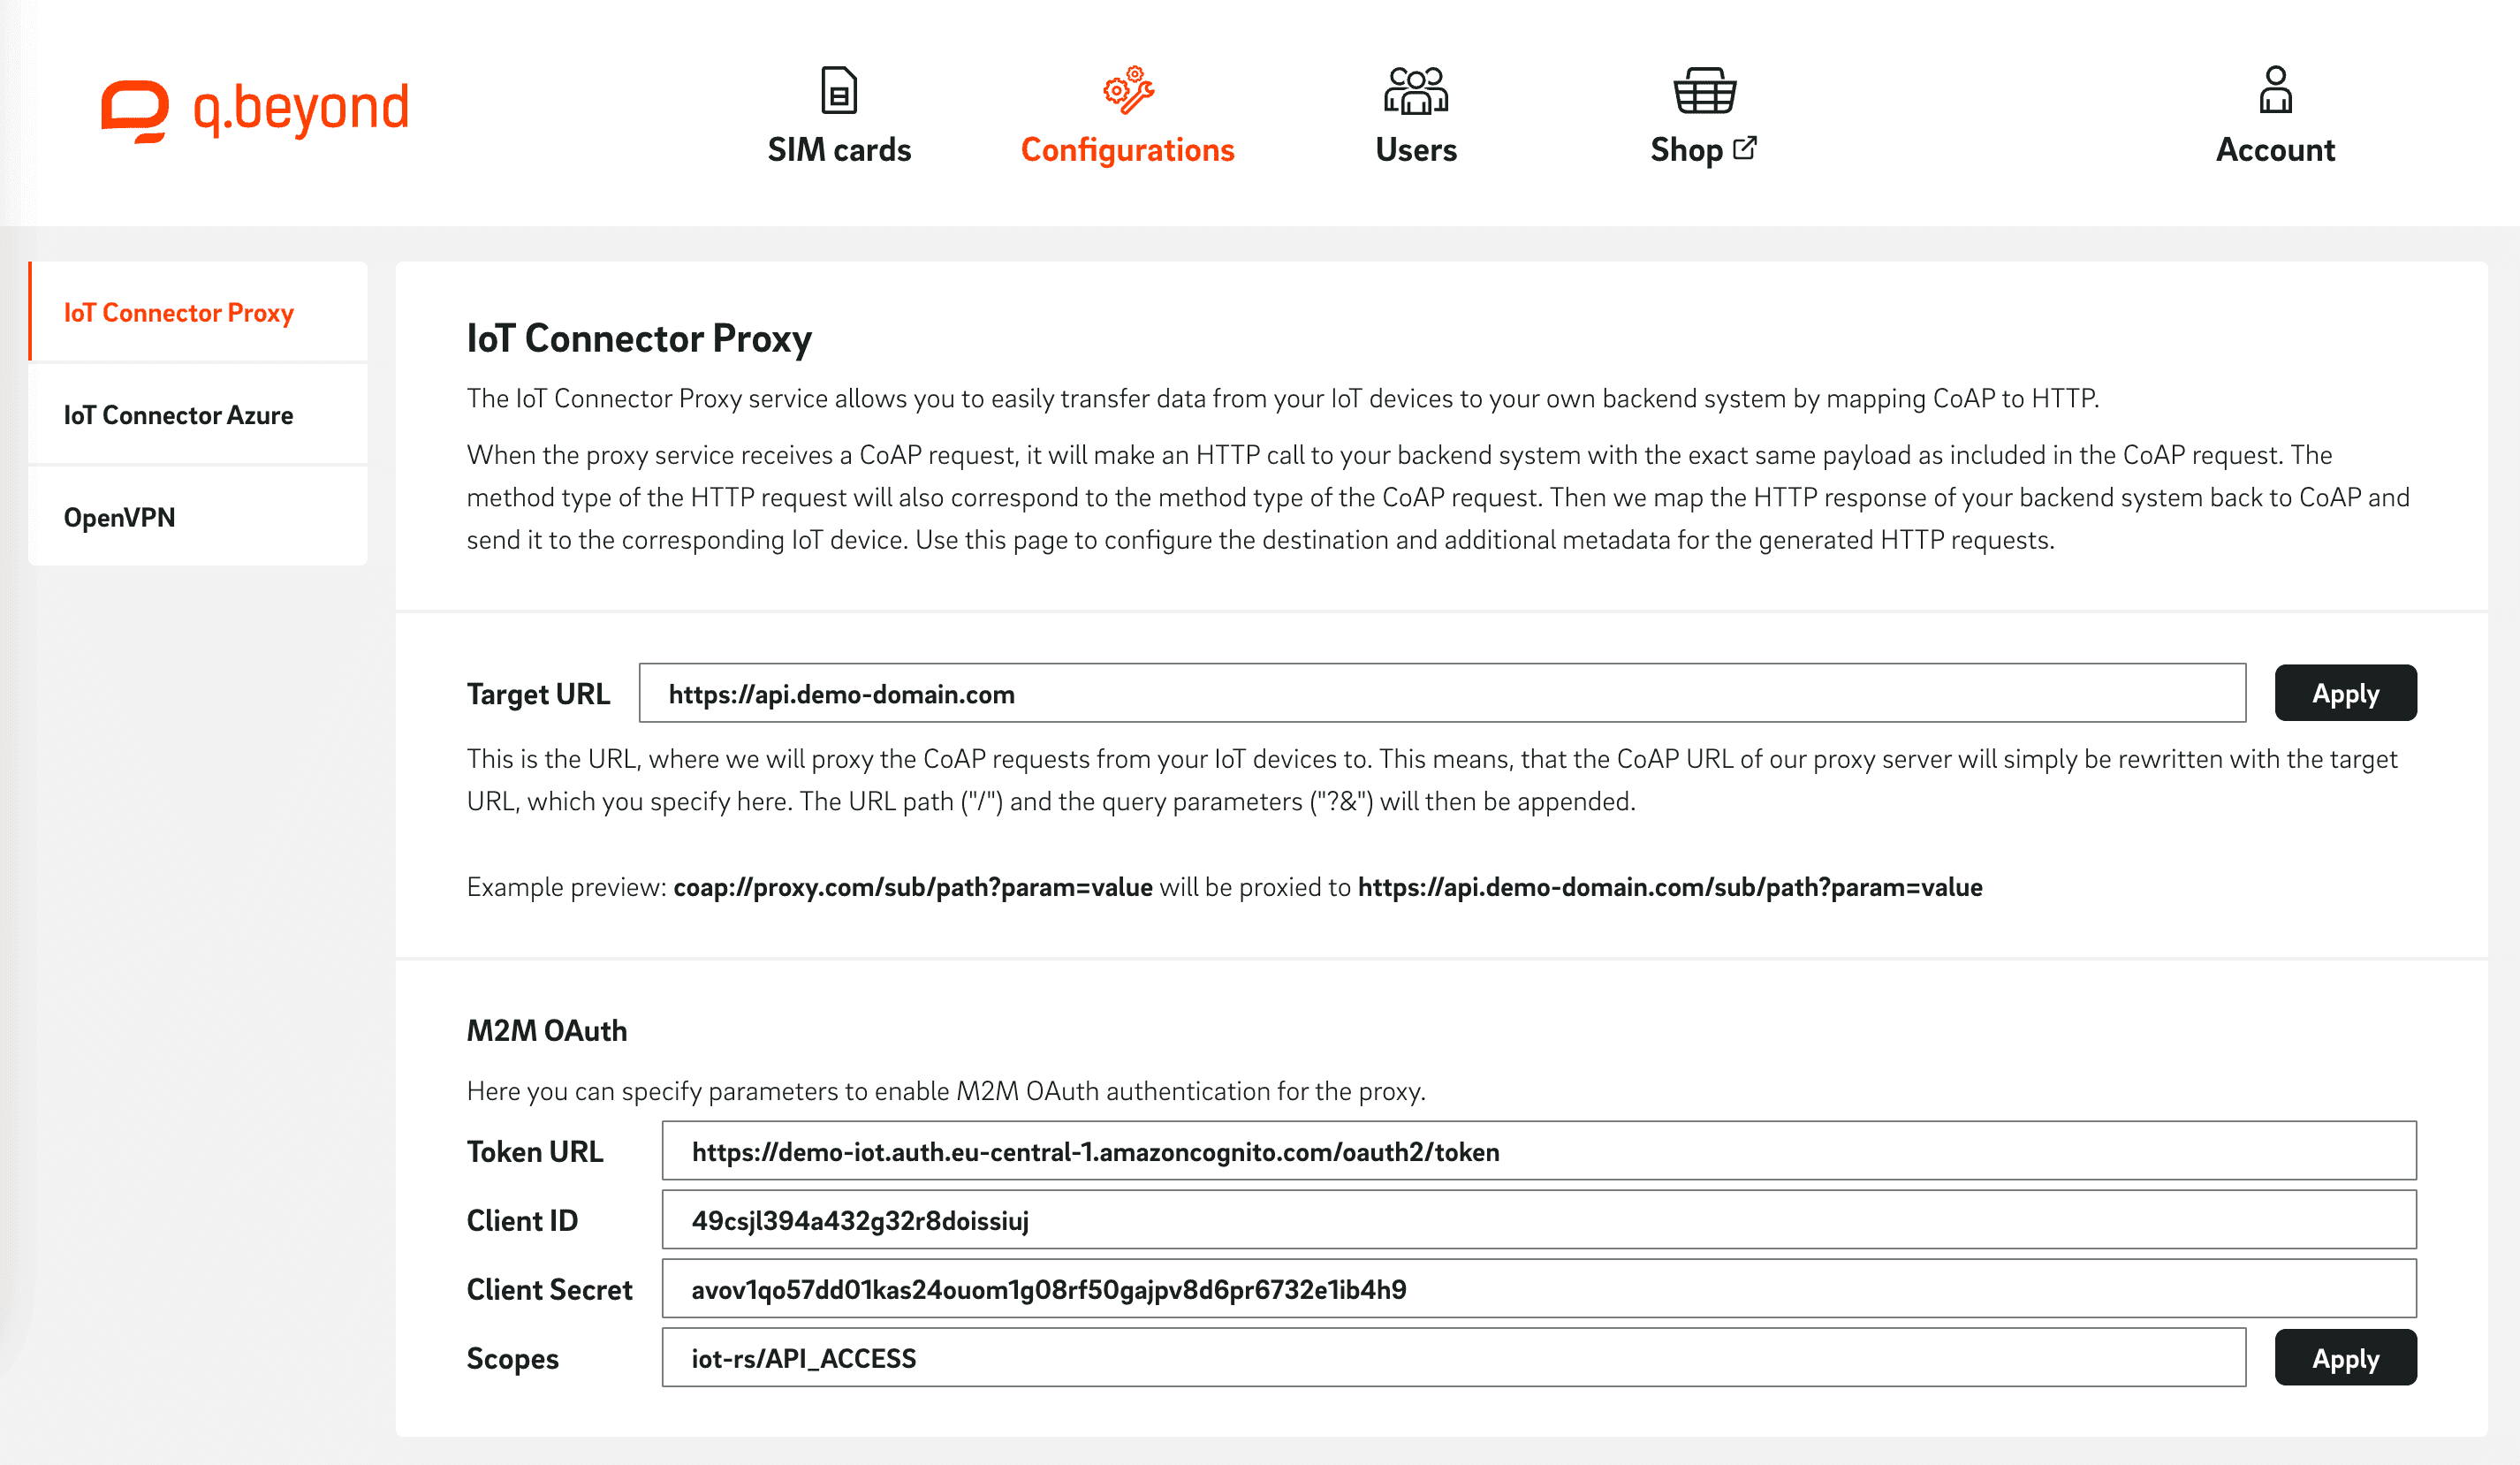
After you have all the necessary information, you can configure the proxy accordingly. To do this, open the IoT SIM portal, navigate to the "Configurations" tab, and select "IoT Connector Proxy". Here you enter the "Target URL" and under "M2M OAuth" the corresponding access data ("Client ID" and "Client Secret"), the "Token URL" and the "Scopes".
Database with Azure IoT Hub
In this example, you will use Azure IoT Hub in combination with Azure Functions to store data in the Cosmos DB.

Azure setup
The following setup is done via the Azure Portal.
Cosmos DB
First, navigate to "Azure Cosmos DB" in the portal and create a new Azure Cosmos DB account or select an existing account. Next, create a new database via "Create" and select "Azure Cosmos DB for NoSQL" as the API. Fill out the form as needed. For the demo, you can set the "Capacity mode" to "Serverless". Complete the creation with "Review + create".
Once the database is online, open it and create a new container using "Add container". Set a "Database id" and "Container id". Make a note of both and confirm the entries with "OK". After the container has been created, a welcome message should be displayed. Below that, click on "Connect" and copy the "PRIMARY CONNECTION STRING".
Azure IoT Hub
First, navigate to "IoT Hub" in the portal and create a new hub using "Create IoT hub". Give the hub a unique "IoT hub name" and select "Free" as the "Tier". Complete the creation by clicking "Review + create".
Within the hub, navigate to "Devices" and press "Add Device". Assign a name and keep the default configuration. Select the new device and copy the value of the "Primary connection string".
Azure Function App
Now we create the link between Hub and DB. To do this, navigate to "Function App" in the portal and create a new Function App via "Create". Assign a unique "Function App name". Select "Node.js" as the "Runtime Stack", leave the "Operating System" set to "Windows" and select "Consumption (Serverless)" as the "Plan type" for testing purposes. Complete the creation with "Review + create".
Once the deployment is complete, select the "Configuration" category. Now create three variables via "New application settings" ("COSMOSDB_CONNECTION_STRING" with the previously copied "PRIMARY CONNECTION STRING" of the Cosmos DB. "COSMOSDB_DATABASE" with the "Database id" and "COSMOSDB_CONTAINER" with the "Container id"). Confirm the entries with "Save" and "Continue".
Then open the category "Console" and enter the following two commands separately:
npm init -y
npm install @azure/cosmos --save
Now select the category "Functions". Create a new function using the "IoT Hub (Event Hub)" template. template. Press the blue "New" button below "Event Hub connection". In the popup, your previously created IoT Hub should be selected under the first "Event Hub connection" and "Events (built-in endpoint)" under that. Confirm this popup with "OK" and the creation with "Create".
Select the new function and navigate to "Code + Test" to modify the default code.
const { CosmosClient } = require('@azure/cosmos');
module.exports = async function (context, IoTHubMessage) {
// Create a Cosmos DB client and container object
const cosmosClient = new CosmosClient(process.env.COSMOSDB_CONNECTION_STRING);
const database = cosmosClient.database(process.env.COSMOSDB_DATABASE);
const container = database.container(process.env.COSMOSDB_CONTAINER);
// Insert new document from the incoming message into the container
await container.items.create({ messages: IoTHubMessage });
// Mark call as done
context.done();
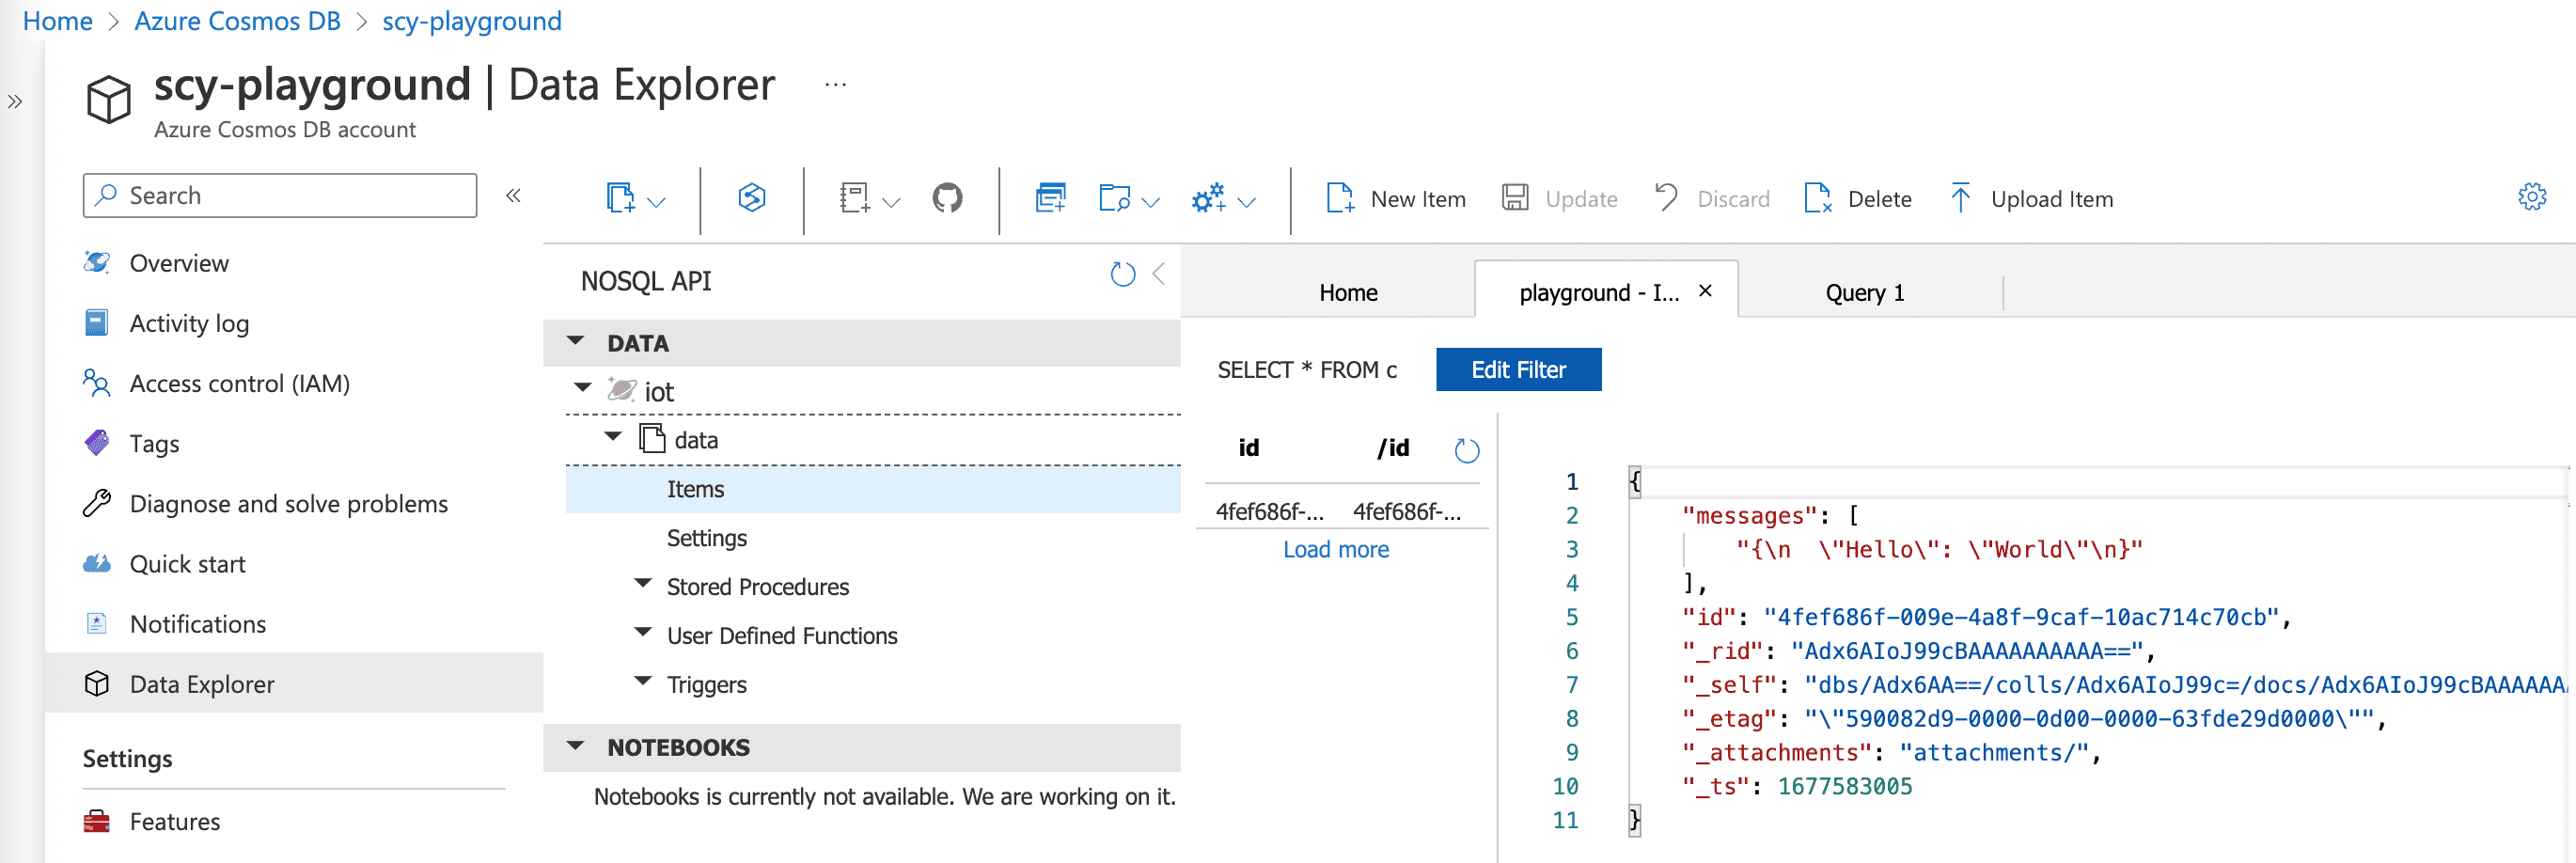
};You can test the function via "Test/Run". For example, enter the following body and press "Run":
{"Hello": "World"}In Cosmo's DB, you should now see a new item under the database in the "Items" tab:
Configure proxy
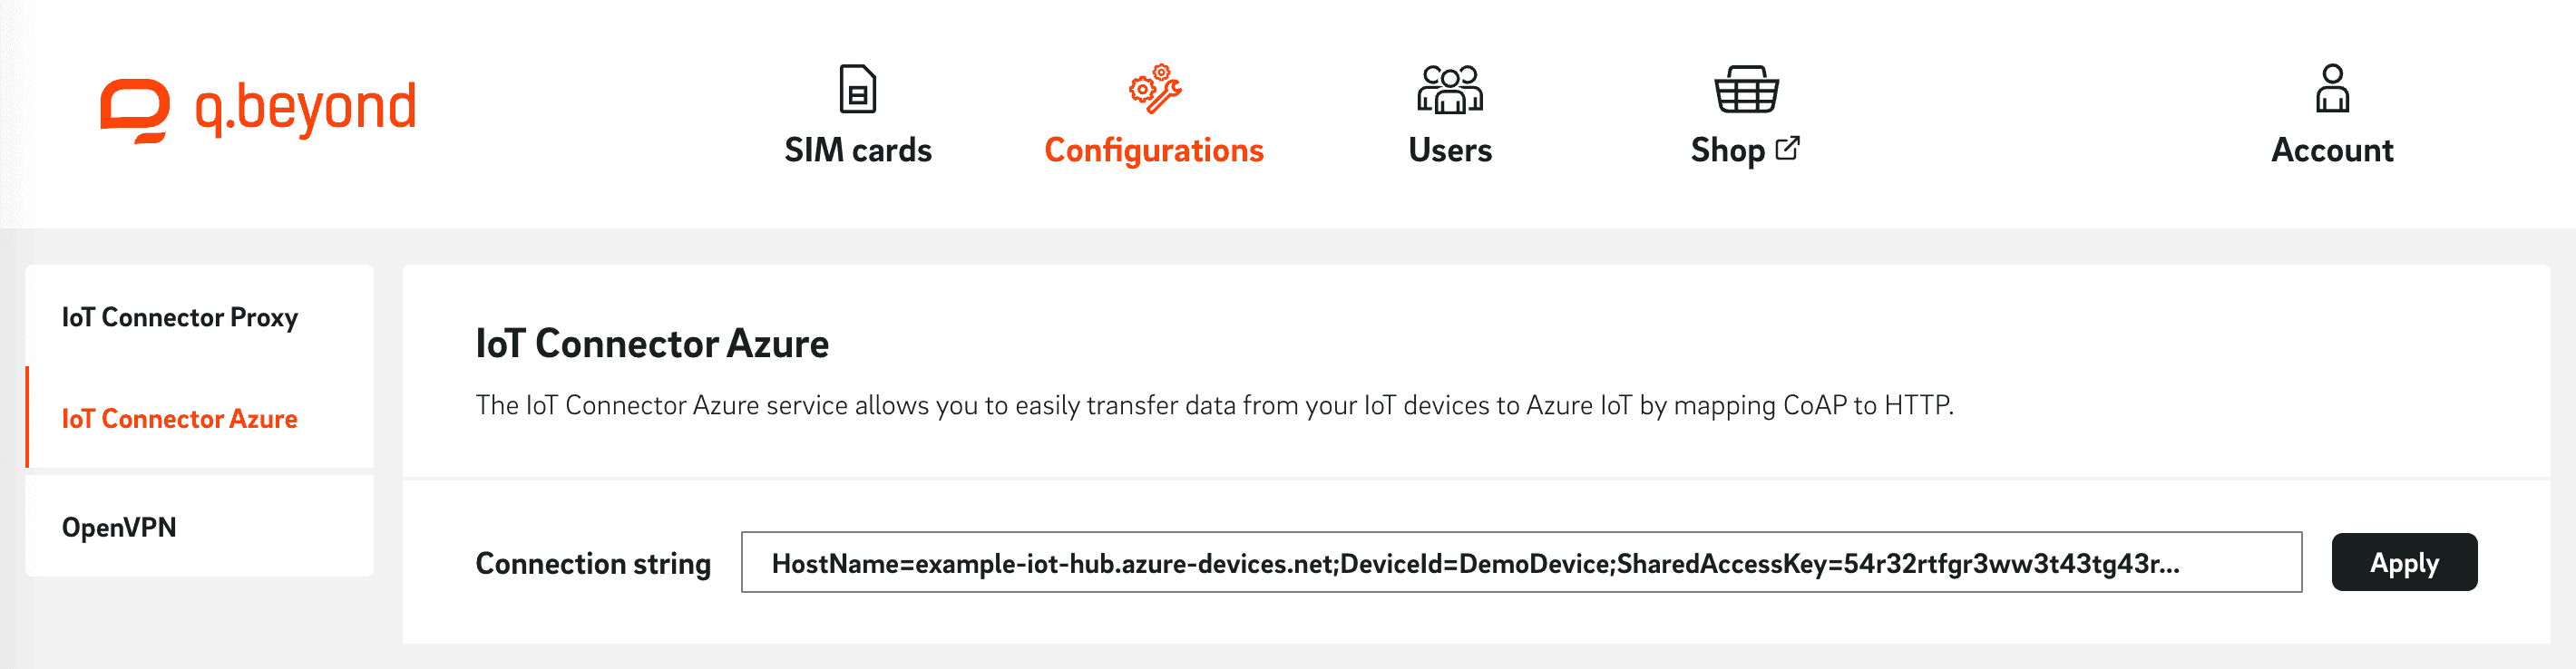
In this step, you store the previously received "Primary connection string" of the device in the proxy configuration. To do this, open the IoT SIM portal, navigate to the "Configurations" tab, and select "IoT Connector Azure". Enter the corresponding value under "Connection string" and apply it by clicking "Apply".
Send CoAP messages
The IoT device can now send messages to the proxy using CoAP, which are then sent to Azure IoT Hub. The URL of the proxy is coap://proxy.connect-internal.iot-sim.tech:5683 (only accessible from the network of IoT SIM). The content (payload) is stored accordingly in the database.
#include <SoftwareSerial.h>
#include <coap-simple.h>

// Software serial pins for SIM800L module
#define rxPin 16
#define txPin 17
SoftwareSerial sim800lSerial(txPin, rxPin);

// CoAP server endpoint
const char* serverEndpoint = "coap://proxy.connect.iotsim.tech:5683";

void setup() {
  // Initialize software serial for SIM800L module
  sim800lSerial.begin(9600);
  while(!sim800lSerial);

  // Turn on SIM800L module
  sim800lSerial.println("AT");
  delay(1000);
  sim800lSerial.println("AT+CPIN?");
  delay(1000);
  sim800lSerial.println("AT+CREG?");
  delay(1000);
  sim800lSerial.println("AT+CGATT=1");
  delay(1000);

  // Initialize CoAP client
  coap_client_init();

  // Set CoAP server endpoint
  coap_client_set_server_endpoint(serverEndpoint);

  // Connect to GPRS network
  connectGPRS()

  // Send CoAP message to proxy
  sendCoAP("{\"text\": \"Hello World\"}")

  // Disconnect from GPRS network
  disconnectGPRS()
}

void connectGPRS() {
  sim800lSerial.println("AT+CIPSHUT");
  delay(1000);
  sim800lSerial.println("AT+CIPMUX=0");
  delay(1000);
  // sim800lSerial.println("AT+CSTT=\"your_APN\",\"your_USERNAME\",\"your_PASSWORD\"");
  // delay(1000);
  sim800lSerial.println("AT+CIICR");
  delay(1000);
  sim800lSerial.println("AT+CIFSR");
  delay(1000);
}

void disconnectGPRS() {
  sim800lSerial.println("AT+CIPSHUT");
  delay(1000);
}

void sendCoAP(char* payload) {
  // Send
  coap_pdu_t pdu;
  coap_pdu_reset(&pdu);
  coap_add_option(&pdu, COAP_OPTION_CONTENT_TYPE, COAP_CONTENT_TYPE_APPLICATION_JSON);
  coap_send_post(&pdu, (uint8_t*)payload, strlen(payload));

  // Await and print response
  coap_wait_response();
  Serial.print("CoAP response: ");
  Serial.write((char*)pdu.payload, pdu.payload_len);
  Serial.println();
}

void loop() {}